AutomateHub: CI/CD Blueprint for RideShare Replica with Proactive Monitoring Implementation (Step-By-Step Guide)


Table of contents
- Introduction:
- Technologies Used in This Project:
- Project Overview:
- Project:
- Step1: Launch an Ubuntu instance (T2.large)
- Step 2: Create IAM role
- Step3: Installations of Packages
- Step4: Connect to Jenkins and Sonarqube
- Step5: Terraform plugin install and EKS provision
- Step6: Plugins installation & setup (Java, Sonar, Nodejs, owasp, Docker)
- Step7: Configure in Global Tool Configuration
- Step8: Configure Sonar Server in Manage Jenkins
- Step09: Pipeline upto Docker
- Step10: Kubernetes Deployment
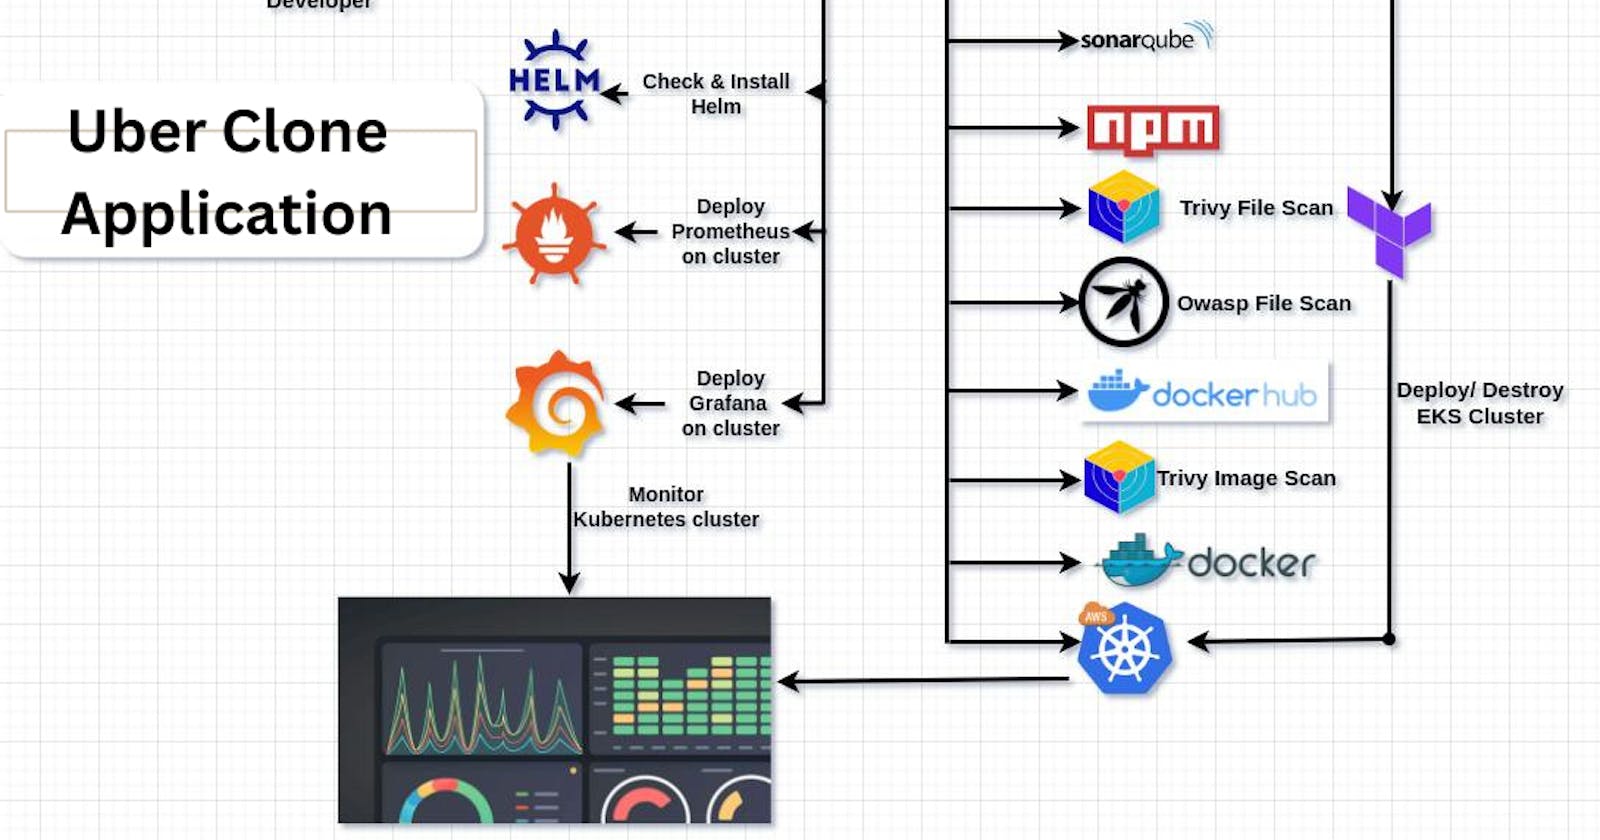
- Step 11: Setup Monitoring on cluster
- Step 12: Destroy EKS cluster when your done with project.
- Conclusion
Introduction:
Embark on a journey into the realm of “Jenkins Driven: CI/CD for Uber Clone with Monitoring Excellence” — an instructive manual that unveils the seamless creation of an Uber-like application. 🚀 Leveraging the power of Jenkins, we navigate the process smoothly — commencing with the utilization of Amazon’s resources, configuring components with Terraform, and culminating in the harmonious orchestration with Docker and Kubernetes. And that’s not all! Enhancing the surveillance aspect, we’ve integrated Grafana and Prometheus to vigilantly monitor your application. 🌐
This comprehensive, step-by-step guide ensures the safety and optimal performance of your Amazon-style app, guiding you from code inception to its live deployment. 🛠️💻 Come aboard, and together, let’s craft your very own Uber Clone!
Technologies Used in This Project:
In the realm of Uber Clone development, a robust DevOps ecosystem plays a pivotal role in streamlining processes and ensuring optimal performance. Let’s explore the key components that contribute to the seamless integration and continuous delivery of your Uber Clone application.
Jenkins: Automating Your Workflow Jenkins takes center stage as the orchestration maestro, overseeing the entire development process. Its role is crucial in ensuring a smooth integration pipeline and facilitating continuous delivery. With Jenkins at the helm, your Uber Clone development accelerates, becoming more efficient and responsive.
Terraform: The Infrastructure Magician Meet Terraform, the wizard behind the scenes. This tool effortlessly conjures up AWS resources, simplifying the setup of your Uber Clone environment. With Terraform’s magic, creating and managing infrastructure becomes a breeze, laying a solid foundation for your application’s growth.
Docker: Containerization Excellence At the heart of consistency and efficiency lies Docker. This tool elegantly wraps up your Uber Clone app into containers, making it portable and easily deployable across various environments. Docker’s containerization prowess ensures that your application remains consistent, regardless of the deployment environment.
Kubernetes: The Deployment Maestro Enter Kubernetes, the deployment maestro that takes Docker’s containers under its wing. Kubernetes manages these containers, ensuring they run seamlessly in your environment. The result? Enhanced scalability and reliability for your Uber Clone application, as Kubernetes orchestrates containerized components with finesse.
Grafana: Visualize, Monitor, Excel For insights that matter, Grafana steps in. This tool empowers you to visualize and monitor the performance of your Uber Clone application. With Grafana, you’re always in the loop, ensuring that your app operates at its peak efficiency.
Prometheus: Your Vigilant Guardian Prometheus assumes the role of a vigilant guardian, keeping a watchful eye on your Uber Clone. This tool collects and analyzes metrics, safeguarding the health and reliability of your application. With Prometheus, potential issues are identified and addressed proactively, contributing to a resilient and dependable Uber Clone.
In synergy, Jenkins, Terraform, Docker, Kubernetes, Grafana, and Prometheus form a powerful DevOps ensemble, elevating your Uber Clone development to new heights of efficiency and reliability.
Project Overview:
Project:
GITHUB REPO:-https://github.com/mudit097/uber-clone
Step1: Launch an Ubuntu instance (T2.large)
1. Sign in to AWS Console: — Log in to your AWS Management Console.
2. Navigate to EC2 Dashboard:
— Select “Services” in the top menu.
— Choose “EC2” under the Compute section.
3. Launch Instance: — Click “Launch Instance” to start creating the instance.
4. Choose AMI: — Select a suitable AMI, such as Ubuntu.
5. Choose Instance Type:
— Pick “t2.large” as the instance type.
— Click “Next: Configure Instance Details.”
6. Configure Instance Details:
— Set “Number of Instances” to 1.
— Configure network, subnets, IAM role, etc.
— For storage, add a new volume (8GB) or modify existing storage (e.g., to 30GB).
— Click “Next: Add Tags.”
7. Add Tags (Optional): — Tag your instance for better organization.
8. Configure Security Group:
— Choose or create a security group.
— Ensure proper inbound/outbound rules.
9. Review and Launch: — Review configuration details.
10. Select Key Pair:
— Choose an existing key pair from the drop-down.
— Confirm access to the selected private key file.
11. Launch Instances: — Click “Launch Instances” to create the instance.
12. Access EC2 Instance: — After launch, access the instance using the key pair and public IP/DNS.
Ensure permissions align with best practices for security groups and key pairs to uphold the EC2 instance’s security.
Step 2: Create IAM role
Look for IAM in the AWS search bar and select “Roles.”

Select “Create Role”
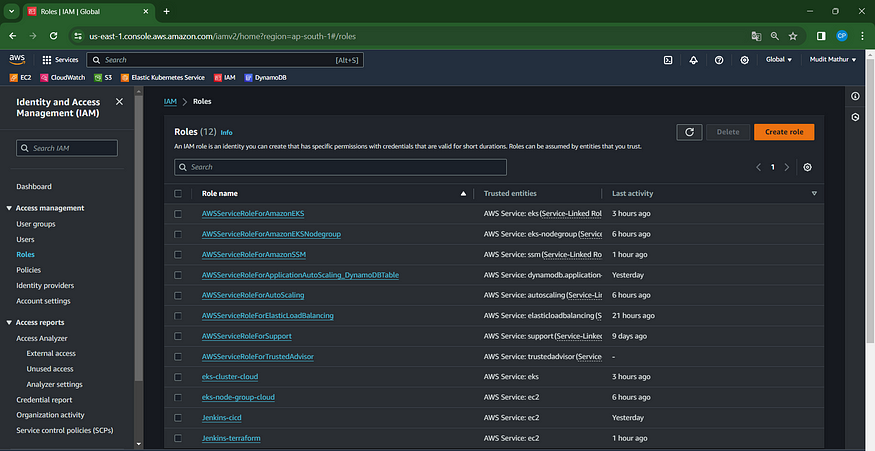
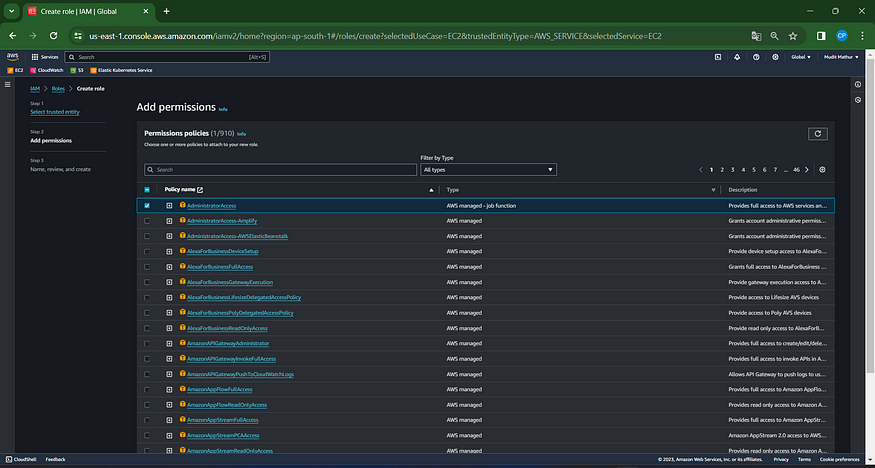
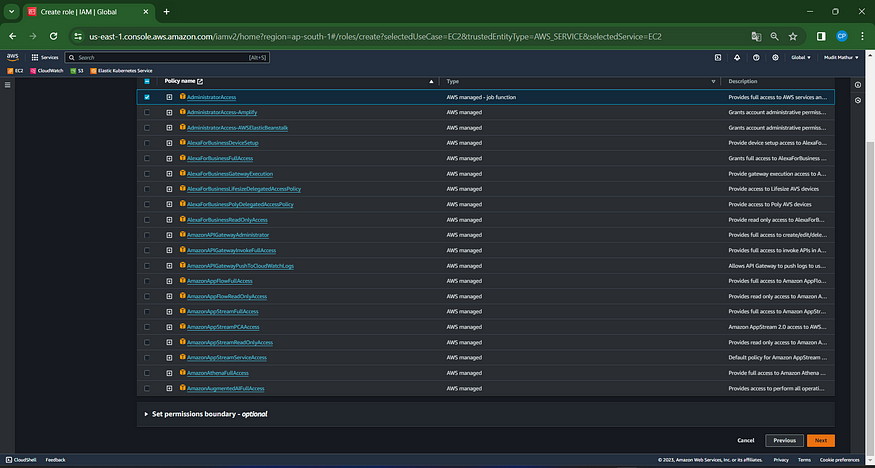
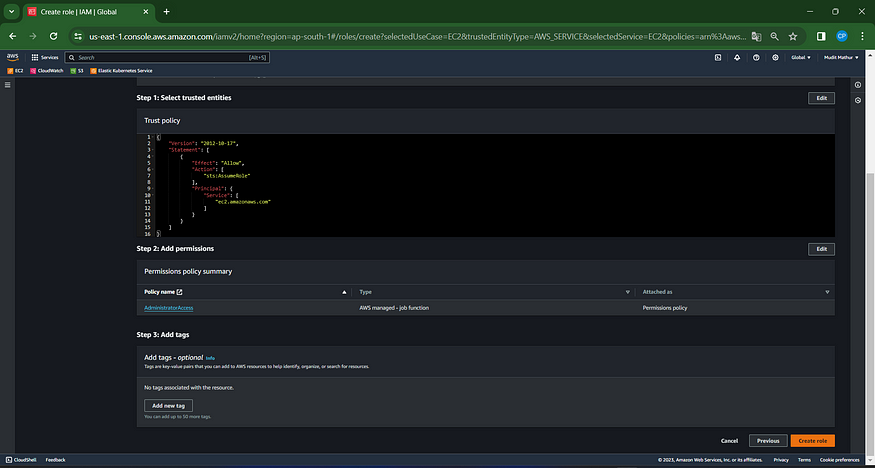
Choose the entity type as an AWS service, opt for EC2 as the use case, and proceed by clicking on Next.

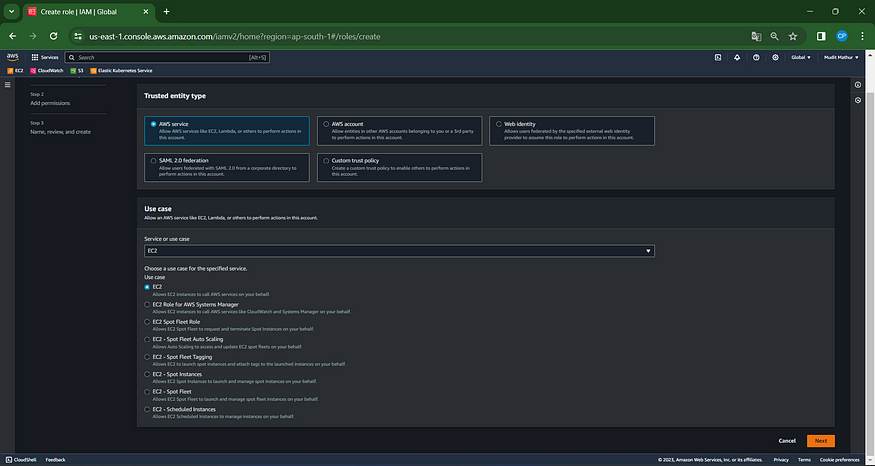
For the permission policy, choose ‘Administrator Access’ (solely for learning purposes), then click Next.
Please enter a name for the role and click on “Create Role.”

A role has been established.
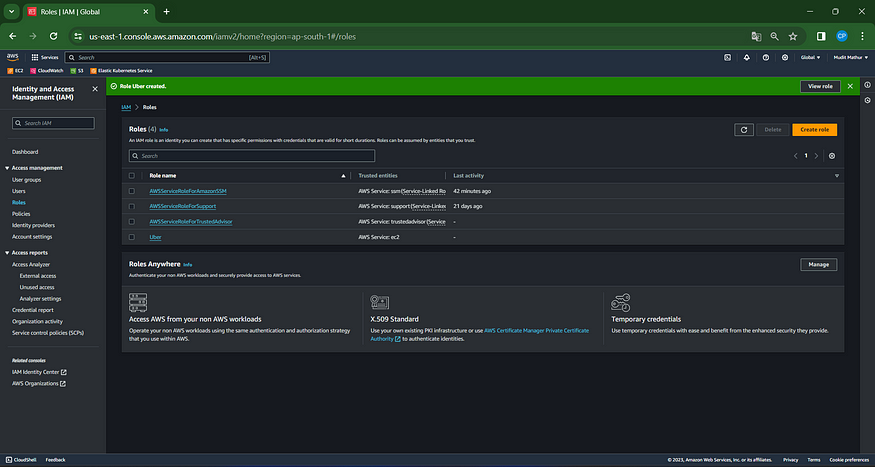
Attach the created role to the EC2 instance we set up earlier, enabling cluster provisioning from that instance.
Navigate to the EC2 Dashboard and choose the relevant instance.
Click on Actions –> Security –> Modify IAM role.
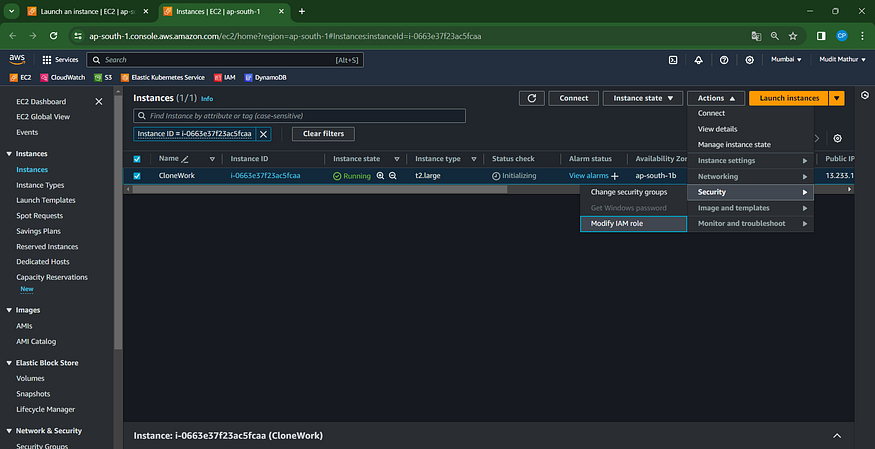
Choose the previously created role and click on “Update IAM role.”

Connect the instance using Mobaxterm or Putty.
Step3: Installations of Packages
Create a shell script on an Ubuntu EC2 instance.
sudo su  # Run from within the root directory
vim script1.sh
Enter this script into it
This script installs Jenkins, Docker , Kubectl, Terraform, AWS Cli, Sonarqube
#!/bin/bash
sudo apt update -y
wget -O - https://packages.adoptium.net/artifactory/api/gpg/key/public | tee /etc/apt/keyrings/adoptium.asc
echo "deb [signed-by=/etc/apt/keyrings/adoptium.asc] https://packages.adoptium.net/artifactory/deb $(awk -F= '/^VERSION_CODENAME/{print$2}' /etc/os-release) main" | tee /etc/apt/sources.list.d/adoptium.list
sudo apt update -y
sudo apt install temurin-17-jdk -y
/usr/bin/java --version
curl -fsSL https://pkg.jenkins.io/debian-stable/jenkins.io-2023.key | sudo tee /usr/share/keyrings/jenkins-keyring.asc > /dev/null
echo deb [signed-by=/usr/share/keyrings/jenkins-keyring.asc] https://pkg.jenkins.io/debian-stable binary/ | sudo tee /etc/apt/sources.list.d/jenkins.list > /dev/null
sudo apt-get update -y
sudo apt-get install jenkins -y
sudo systemctl start jenkins
#install docker
# Add Docker's official GPG key:
sudo apt-get update
sudo apt-get install ca-certificates curl gnupg -y
sudo install -m 0755 -d /etc/apt/keyrings
curl -fsSL https://download.docker.com/linux/ubuntu/gpg | sudo gpg --dearmor -o /etc/apt/keyrings/docker.gpg
sudo chmod a+r /etc/apt/keyrings/docker.gpg
# Add the repository to Apt sources:
echo \
  "deb [arch=$(dpkg --print-architecture) signed-by=/etc/apt/keyrings/docker.gpg] https://download.docker.com/linux/ubuntu \
  $(. /etc/os-release && echo "$VERSION_CODENAME") stable" | \
  sudo tee /etc/apt/sources.list.d/docker.list > /dev/null
sudo apt-get update
sudo apt-get install docker-ce docker-ce-cli containerd.io docker-buildx-plugin docker-compose-plugin -y
sudo usermod -aG docker ubuntu
newgrp docker
Now provide executable permissions to shell script
chmod 777 script1.sh
sh script1.sh
Let’s Run the second script
vim script2.sh
Add this script
#!/bin/bash

# Install Trivy
sudo apt-get install wget apt-transport-https gnupg lsb-release -y
wget -qO - https://aquasecurity.github.io/trivy-repo/deb/public.key | gpg --dearmor | sudo tee /usr/share/keyrings/trivy.gpg > /dev/null
echo "deb [signed-by=/usr/share/keyrings/trivy.gpg] https://aquasecurity.github.io/trivy-repo/deb $(lsb_release -sc) main" | sudo tee -a /etc/apt/sources.list.d/trivy.list
sudo apt-get update
sudo apt-get install trivy -y

# Install Terraform
sudo apt install wget -y
wget -O- https://apt.releases.hashicorp.com/gpg | sudo gpg --dearmor -o /usr/share/keyrings/hashicorp-archive-keyring.gpg
echo "deb [signed-by=/usr/share/keyrings/hashicorp-archive-keyring.gpg] https://apt.releases.hashicorp.com $(lsb_release -cs) main" | sudo tee /etc/apt/sources.list.d/hashicorp.list
sudo apt update && sudo apt install terraform -y

# Install kubectl
sudo apt update
sudo apt install curl -y
curl -LO https://dl.k8s.io/release/$(curl -L -s https://dl.k8s.io/release/stable.txt)/bin/linux/amd64/kubectl
sudo install -o root -g root -m 0755 kubectl /usr/local/bin/kubectl
kubectl version --client

# Install AWS CLI
curl "https://awscli.amazonaws.com/awscli-exe-linux-x86_64.zip" -o "awscliv2.zip"
sudo apt-get install unzip -y
unzip awscliv2.zip
sudo ./aws/install

# Install Helm
curl -fsSL -o get_helm.sh https://raw.githubusercontent.com/helm/helm/master/scripts/get-helm-3
chmod 700 get_helm.sh
./get_helm.sh
Now
chmod 777 script2.sh
sh script2.sh
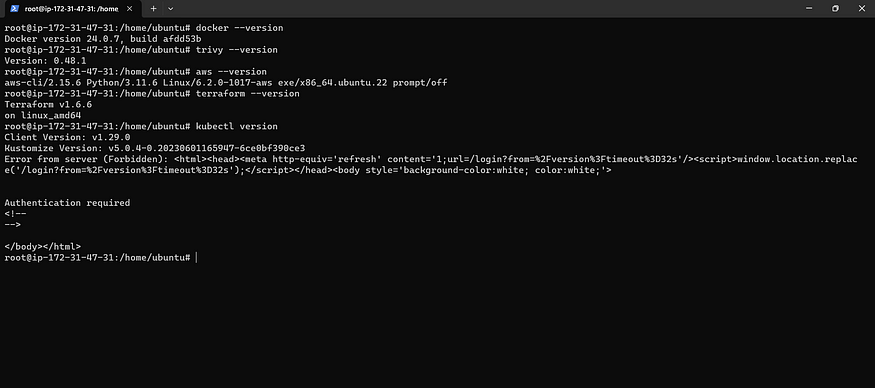
Verify the installation of all packages.
docker --version
trivy --version
aws --version
terraform --version
helm version
kubectl version
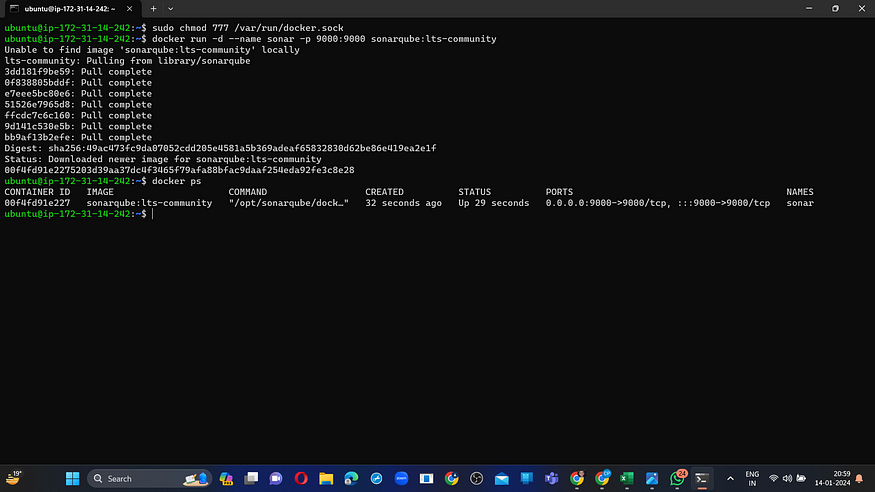
Grant executable permissions using Mobaxtreme
sudo chmod 777 /var/run/docker.sock
docker run -d --name sonar -p 9000:9000 sonarqube:lts-community
Step4: Connect to Jenkins and Sonarqube
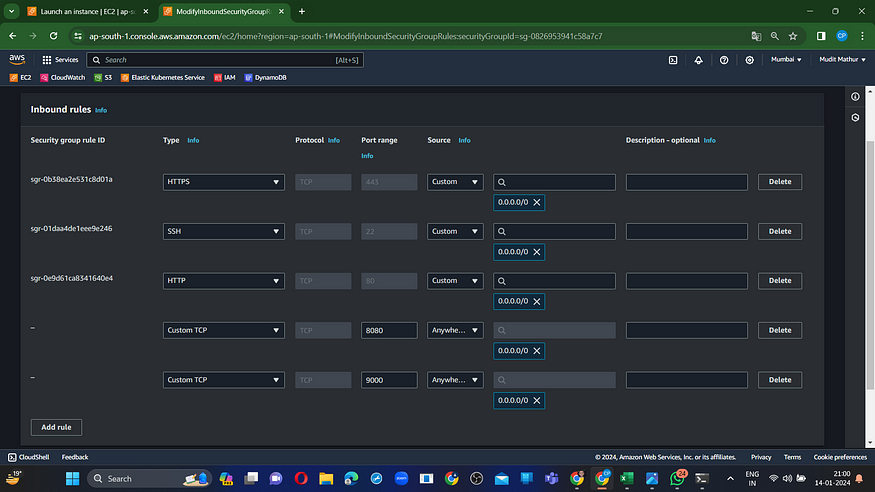
Now, please copy the public IP address of the EC2 instance and paste it into your web browser.
Prior to that, modify the inbound rules of the EC2 instance to allow traffic on ports 8080 and 9000.
<Ec2-ip:8080> #you will Jenkins login page
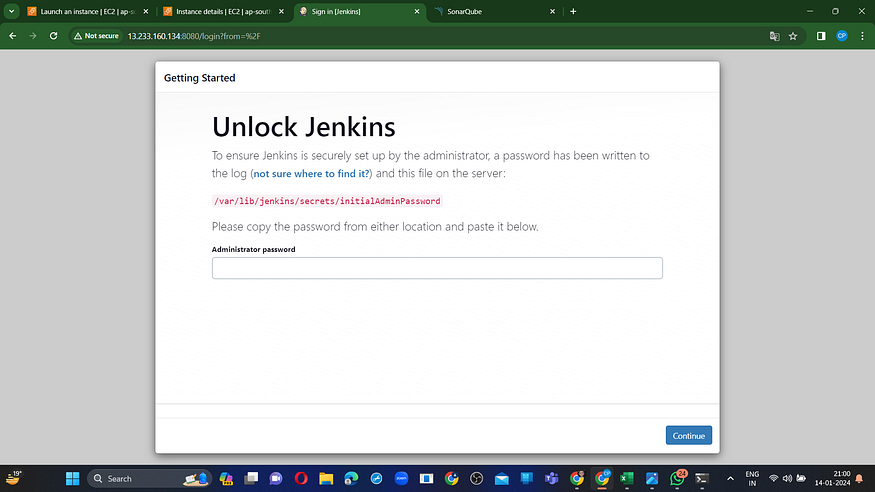
Connect your instance to PuTTY or MobaXterm and then provide the following command to set the Administrator password:
sudo cat /var/lib/jenkins/secrets/initialAdminPassword

Now, proceed to install the recommended plugins.

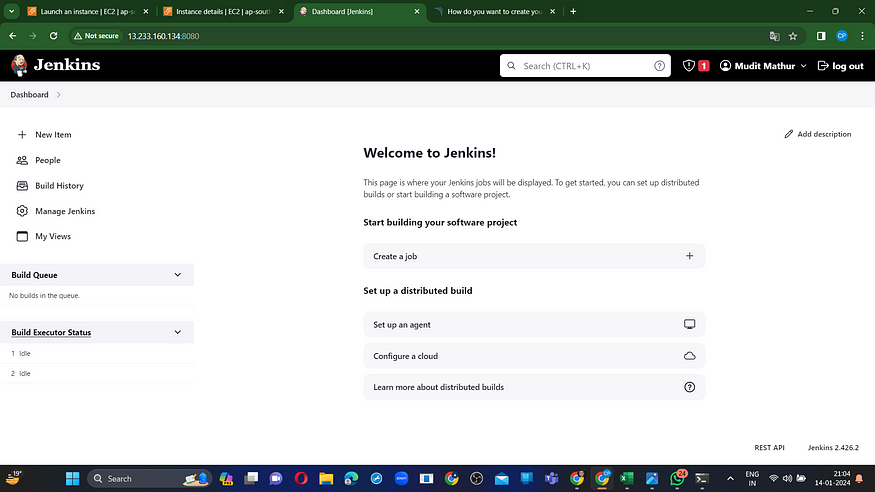
Jenkins will be installed and all libraries will be installed.
Establish an administrative user account.
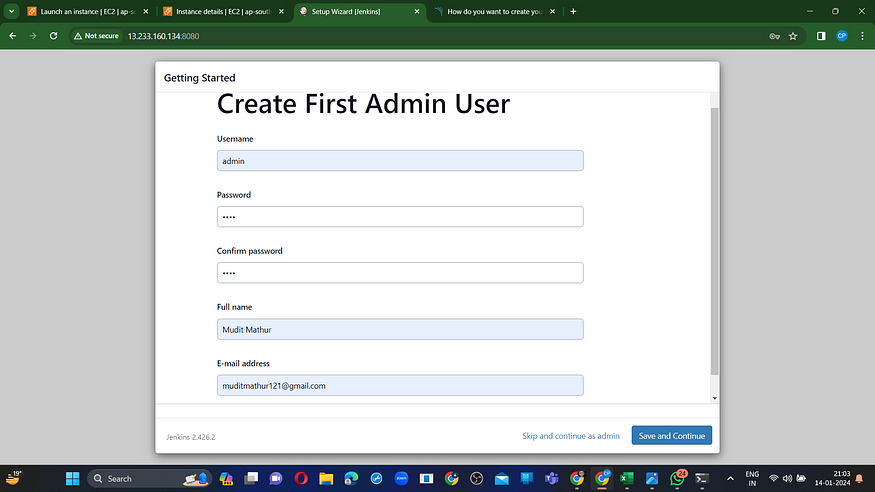
Click ‘Save and Continue’ on the Jenkins dashboard.
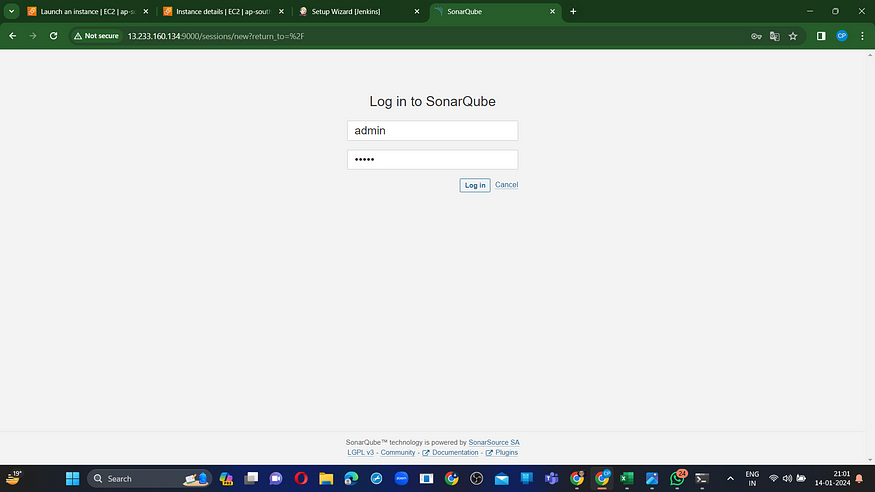
Copy the public IP once more, and then paste it into a new browser tab using port 9000.
<ec2-ip:9000> #runs sonar container
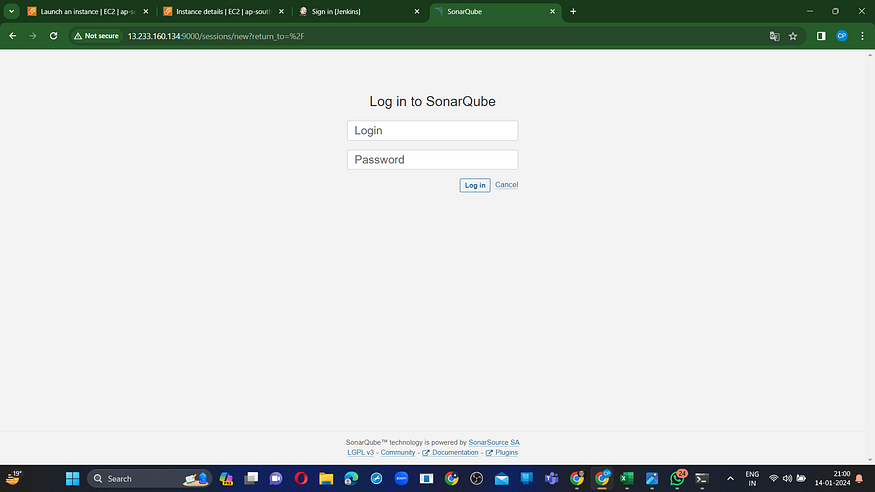
Please provide your username and password, then select the “Login” option. You can also update your password after logging in.
username admin
password admin
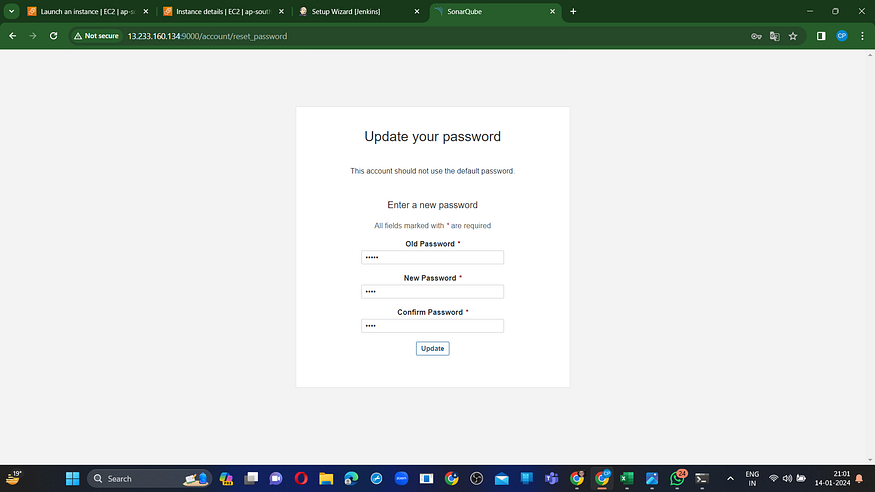
New Password Update: Access the Sonar Dashboard.
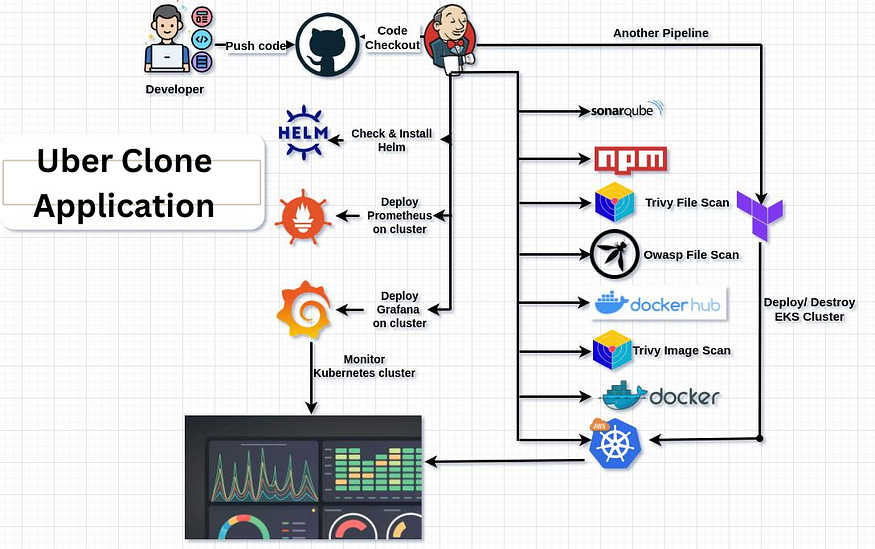
Step5: Terraform plugin install and EKS provision
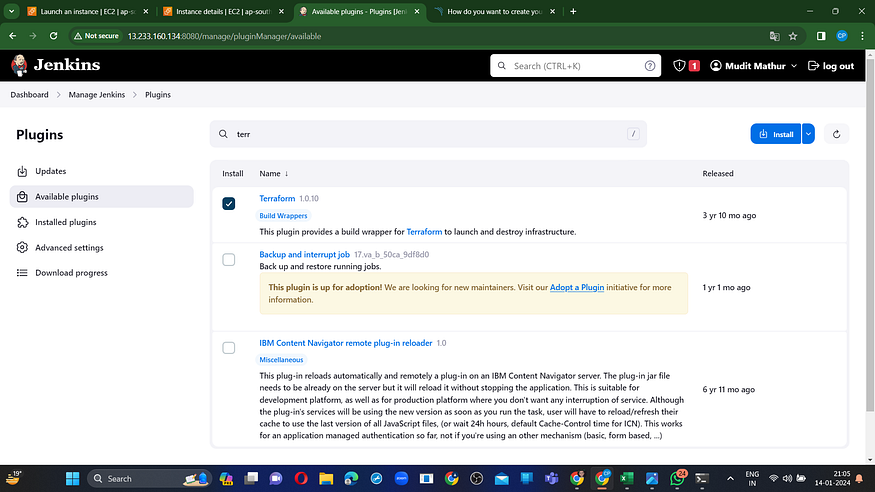
Now, navigate to Jenkins and incorporate a Terraform plugin to facilitate the provisioning of AWS EKS through the Pipeline Job.
Access the Jenkins dashboard –> Navigate to Manage Jenkins –> Select Plugins
In the Available Plugins section, search for ‘Terraform’ and proceed to install it.
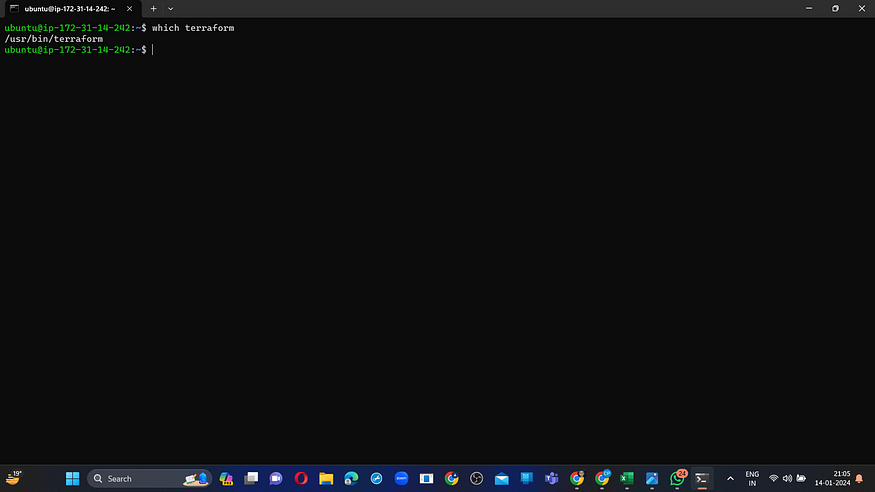
Locate the path to our Terraform installation (which will be utilized in the tools section of Terraform).
which terraform
Now, return to ‘Manage Jenkins’ –> ‘Global Tool Configuration.’
Include Terraform in the Tools section.
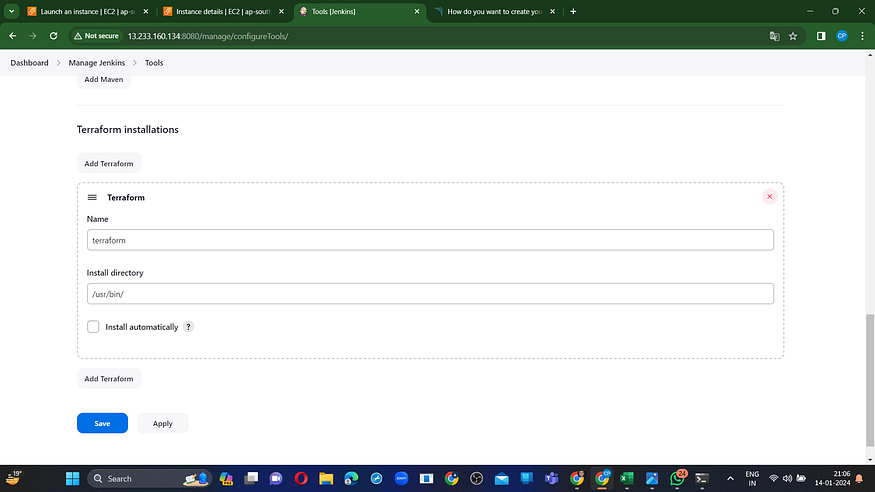
Apply and save your changes.
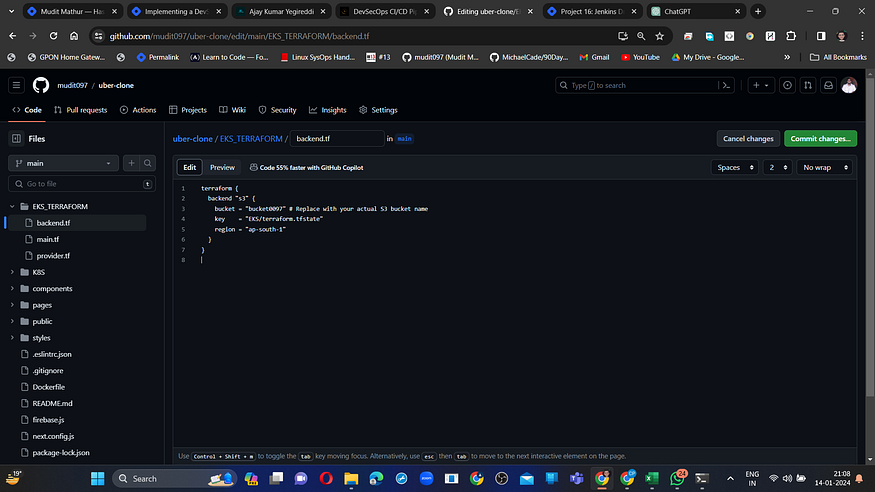
MODIFY THE S3 BUCKET NAME IN THE BACKEND.TF (https://github.com/mudit097/uber-clone.git) FILE.
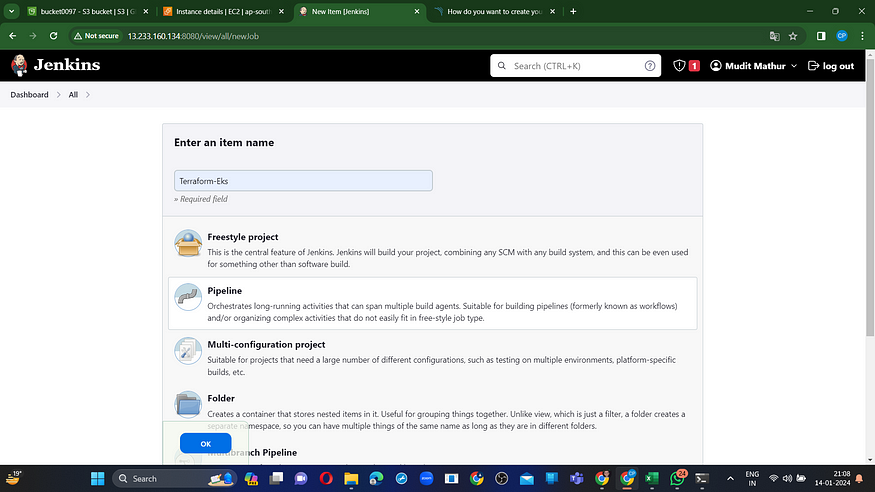
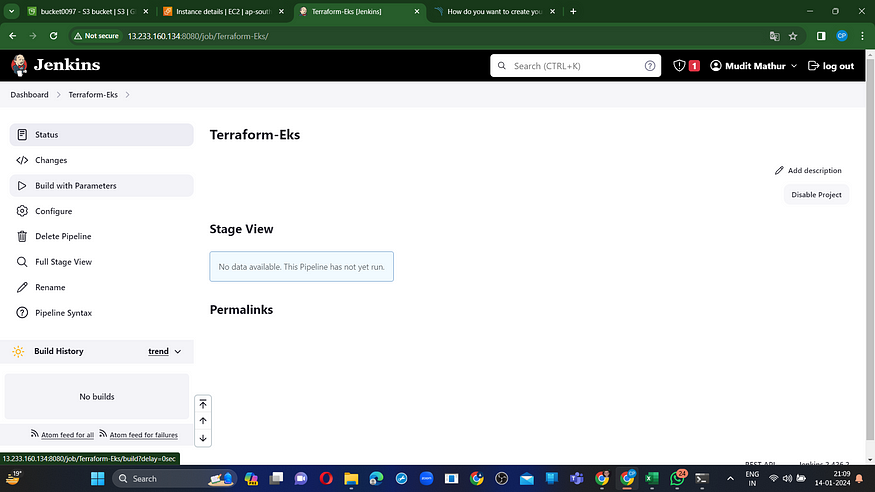
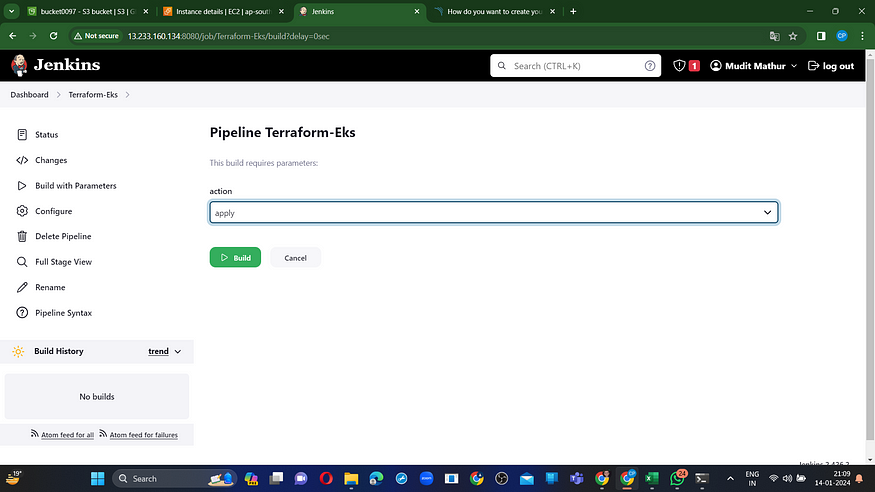
Next, initiate a new task for provisioning EKS.
I aim to implement this using build parameters for the application and destruction processes exclusively. Please incorporate this within the job, as illustrated in the image below.
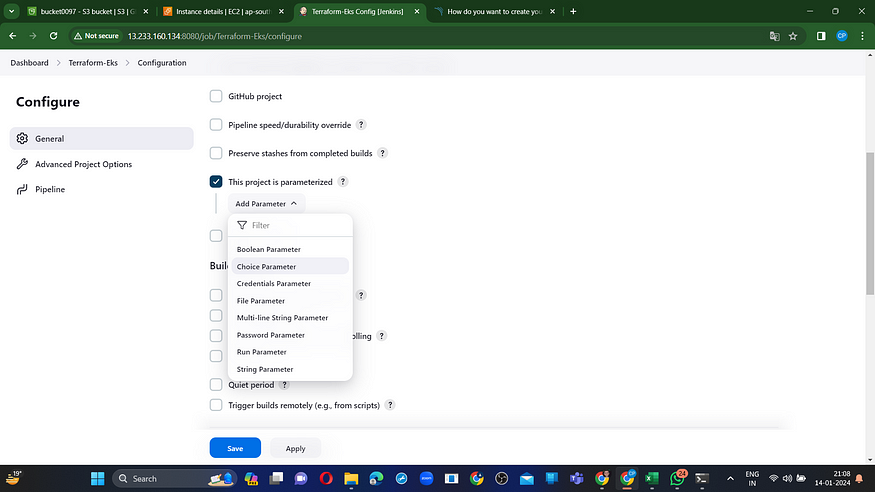
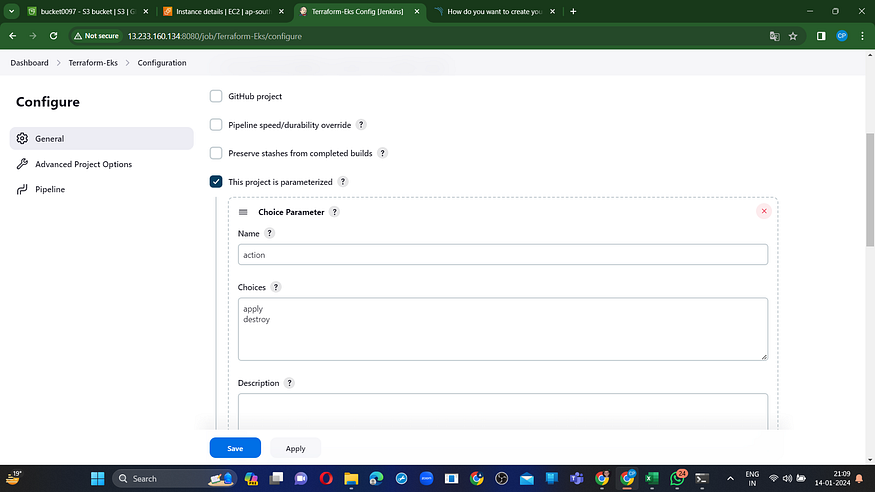
Let’s incorporate a pipeline.
pipeline{
    agent any
    stages {
        stage('Checkout from Git'){
            steps{
                git branch: 'main', url: 'https://github.com/mudit097/uber-clone.git'
            }
        }
        stage('Terraform version'){
             steps{
                 sh 'terraform --version'
             }
        }
        stage('Terraform init'){
             steps{
                 dir('EKS_TERRAFORM') {
                      sh 'terraform init'
                   }
             }
        }
        stage('Terraform validate'){
             steps{
                 dir('EKS_TERRAFORM') {
                      sh 'terraform validate'
                   }
             }
        }
        stage('Terraform plan'){
             steps{
                 dir('EKS_TERRAFORM') {
                      sh 'terraform plan'
                   }
             }
        }
        stage('Terraform apply/destroy'){
             steps{
                 dir('EKS_TERRAFORM') {
                      sh 'terraform ${action} --auto-approve'
                   }
             }
        }
    }
}

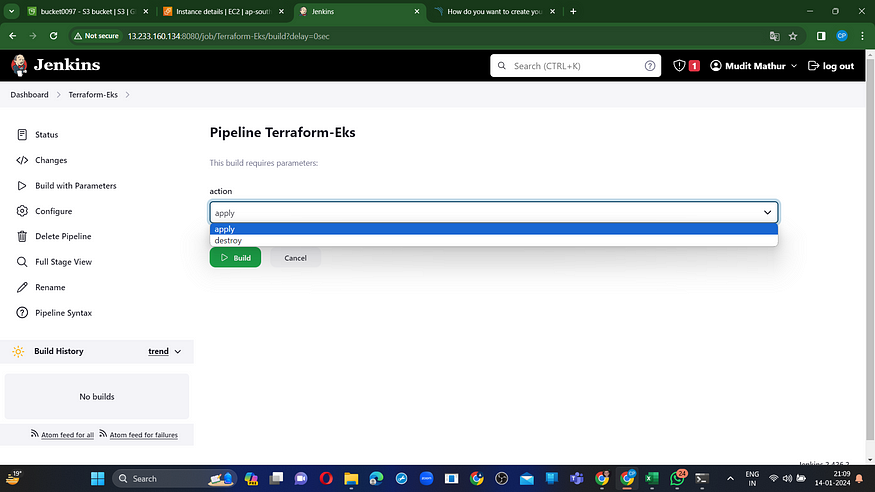
Apply, save, and build using parameters, then choose ‘apply’ as the action.
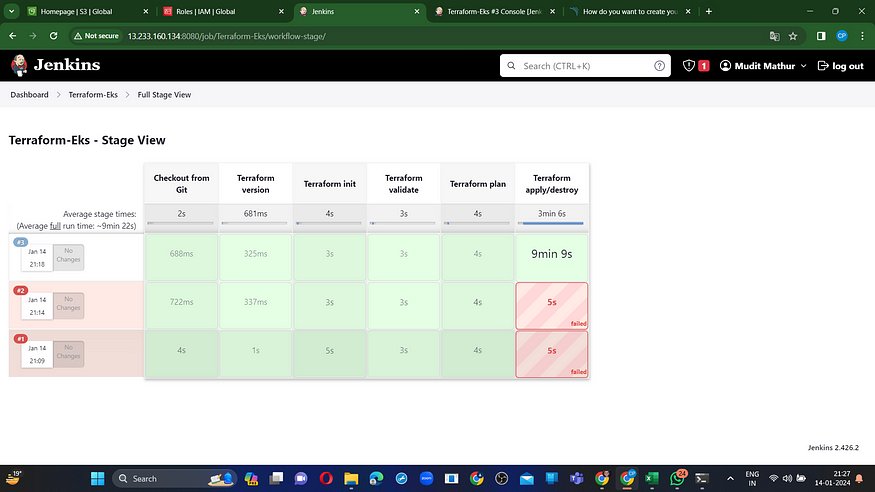
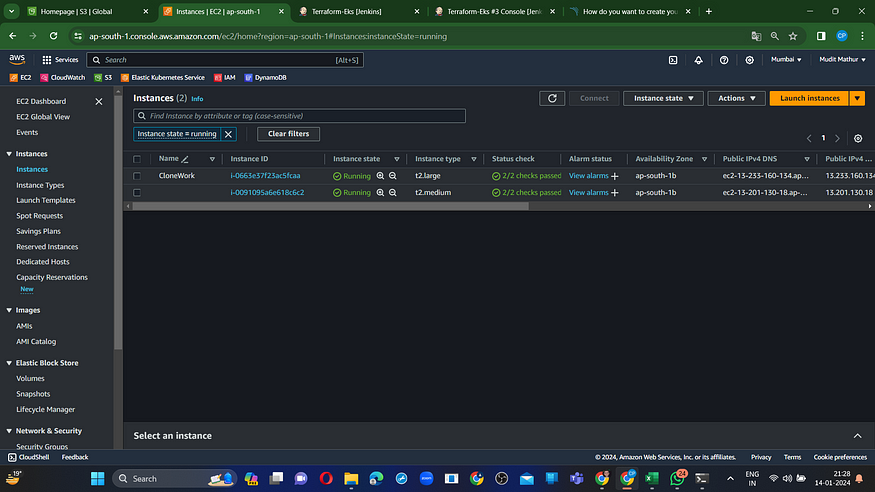
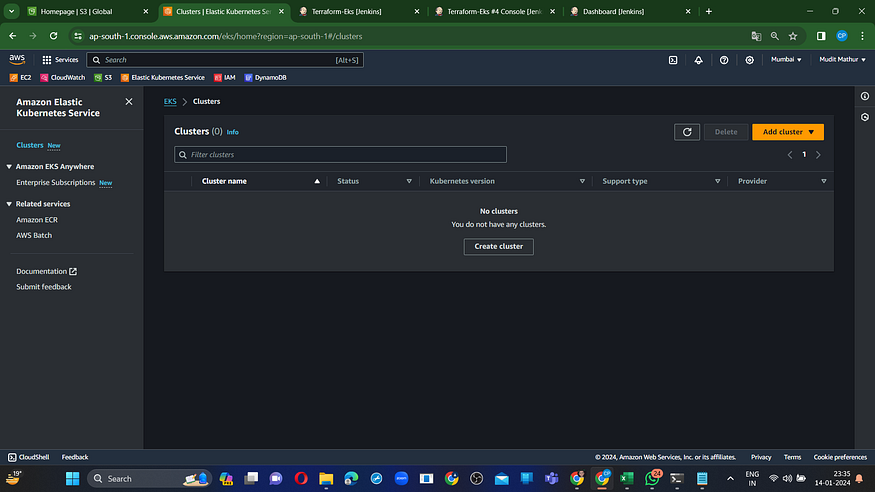
Verify in your AWS console to confirm the creation of the EKS instance.
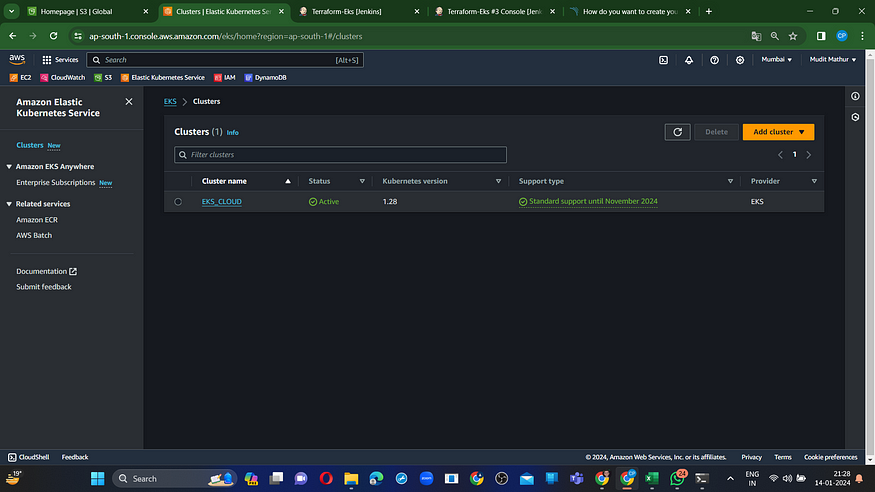
An EC2 instance has been successfully generated for the Node group.
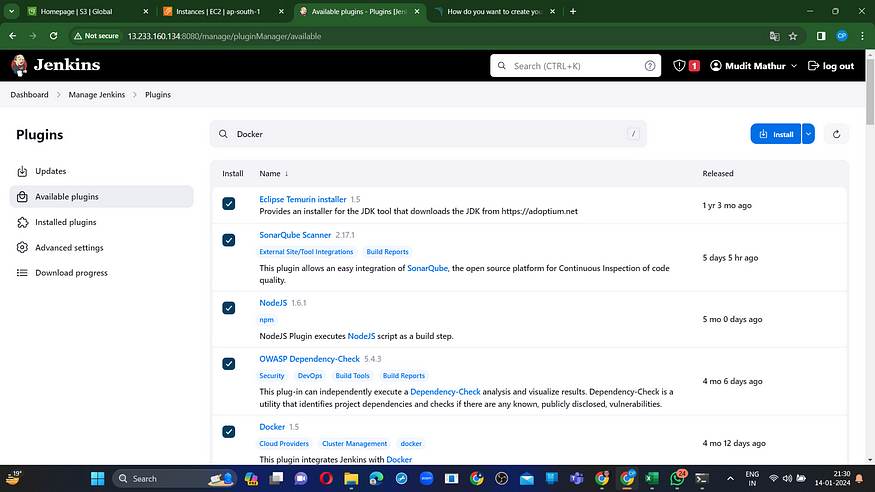
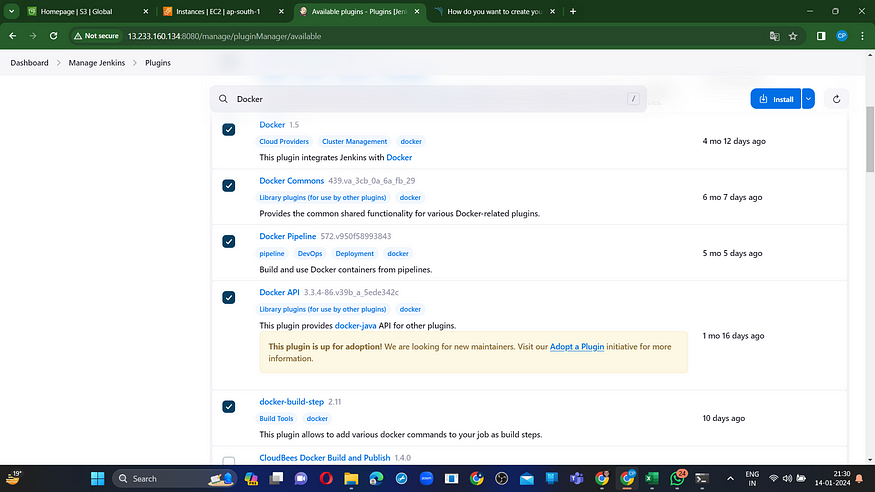
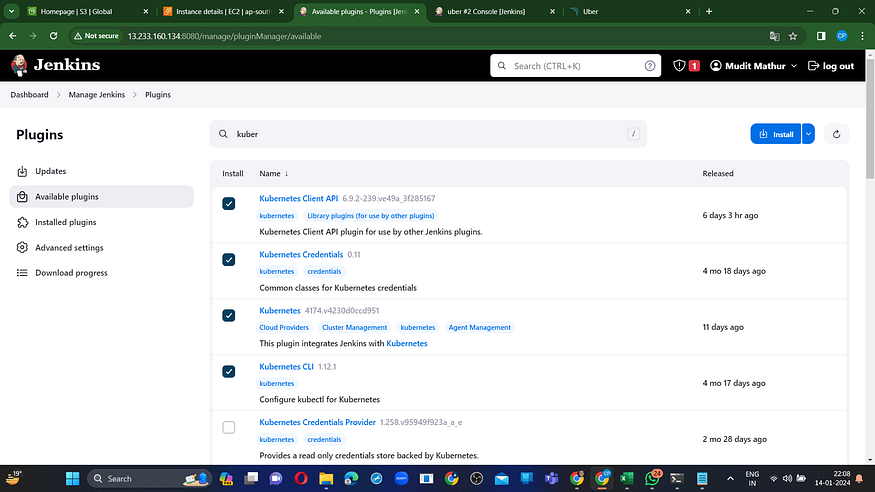
Step6: Plugins installation & setup (Java, Sonar, Nodejs, owasp, Docker)
Navigate to the Jenkins dashboard.
Go to “Manage Jenkins” → “Manage Plugins” → “Available Plugins.”
Search for the following plugins:
1. Eclipse Temurin Installer
2. SonarQube Scanner
3. Node.js
4. OWASP Dependency-Check
5. Docker
6. Docker Commons
7. Docker Pipeline
8. Docker API
9. Docker Build Step
Step7: Configure in Global Tool Configuration
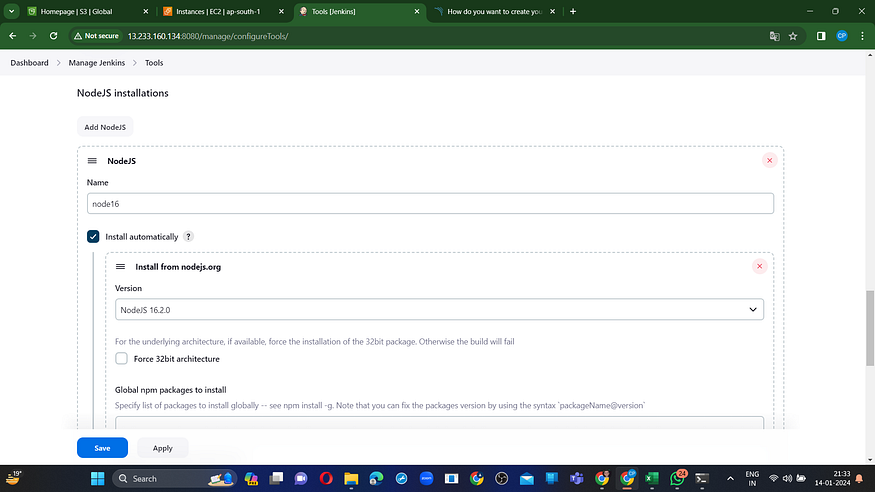
Navigate to Manage Jenkins → Tools → Install JDK 17 and NodeJs 16 → Click Apply and Save.
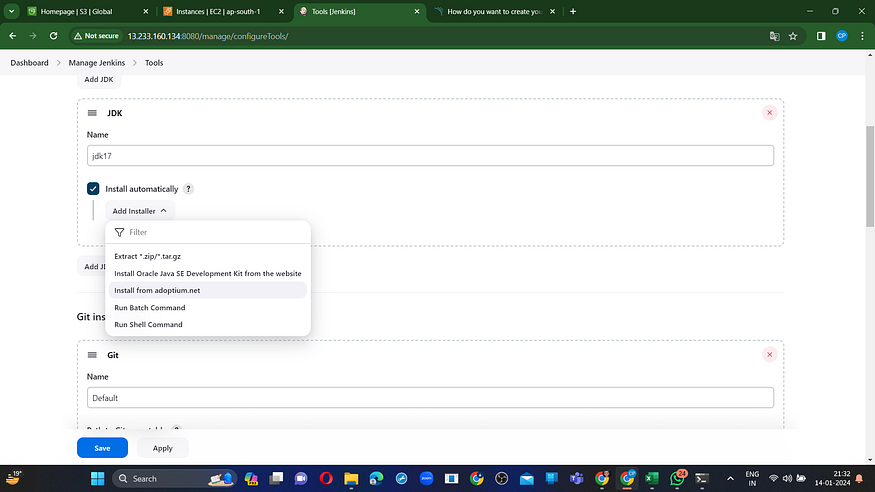
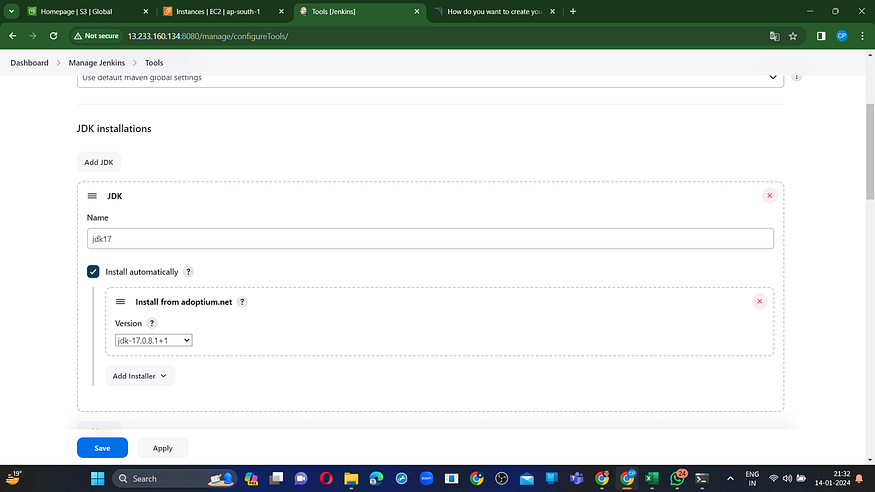
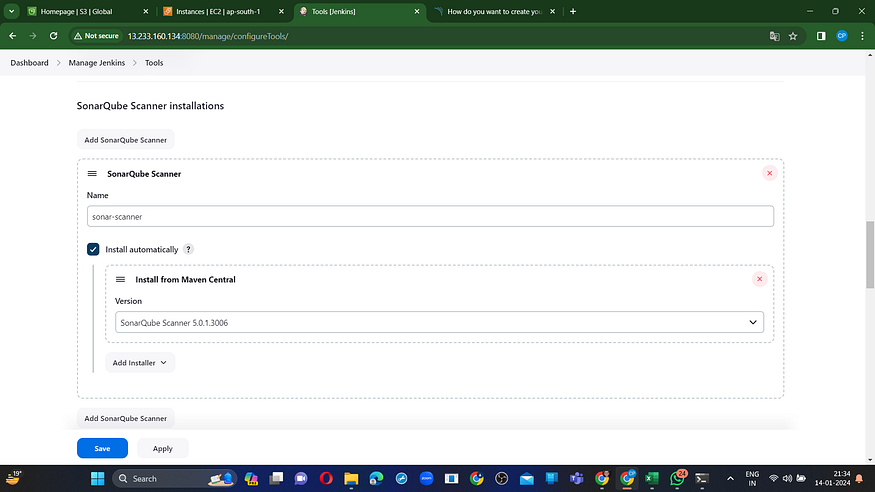
For SonarQube, ensure you are using the most up-to-date version.
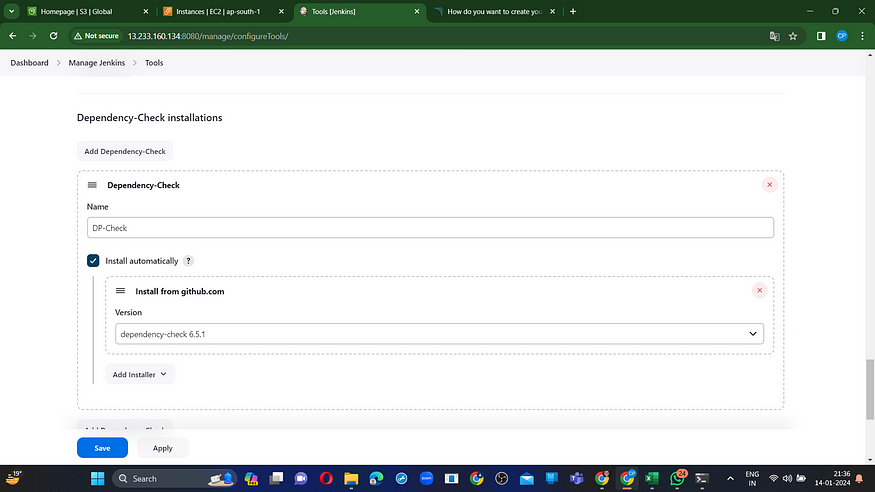
For OWASP, please utilize version 6.5.1.
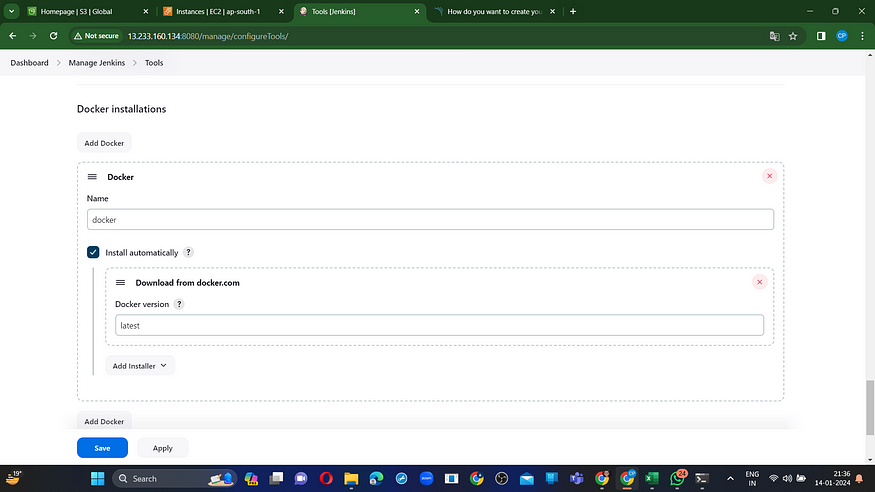
Use the latest version of Docker
Click apply and save.
Step8: Configure Sonar Server in Manage Jenkins
Retrieve the Public IP Address of your EC2 Instance. Sonarqube operates on Port 9000, so use <Public IP>:9000. Navigate to your Sonarqube Server, then select Administration → Security → Users → Tokens. Click on “Update Token,” assign it a name, and finally, click on “Generate Token.”
click on update Token

Create a token with a name and generate

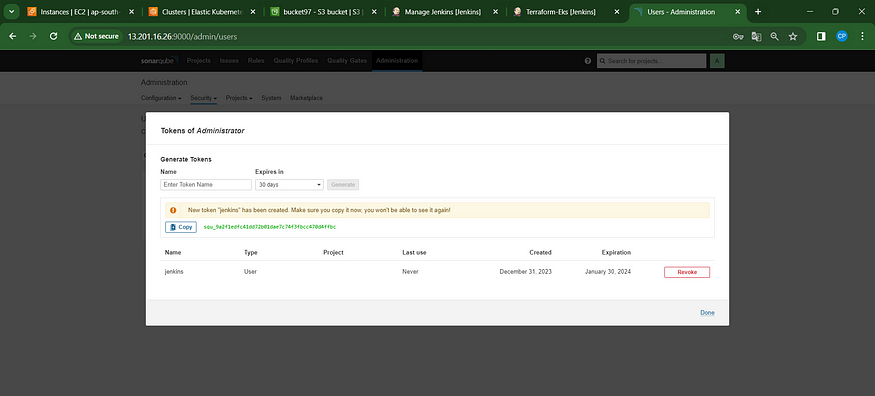
Copy that token
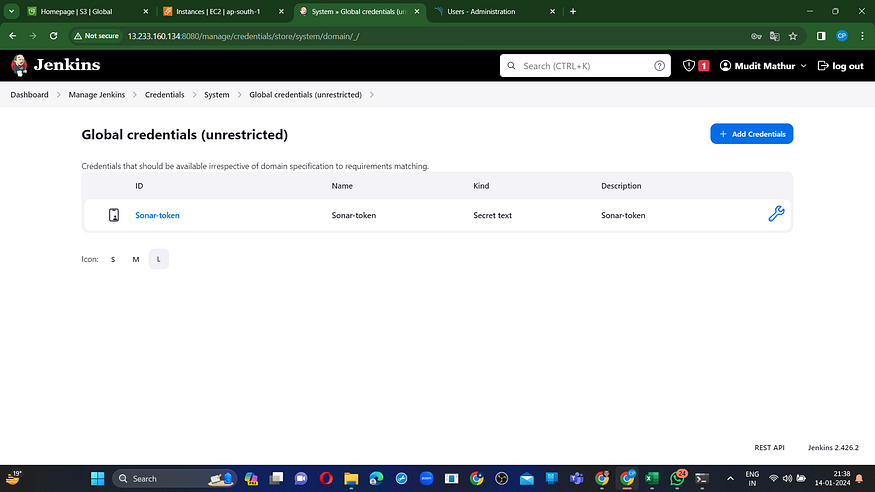
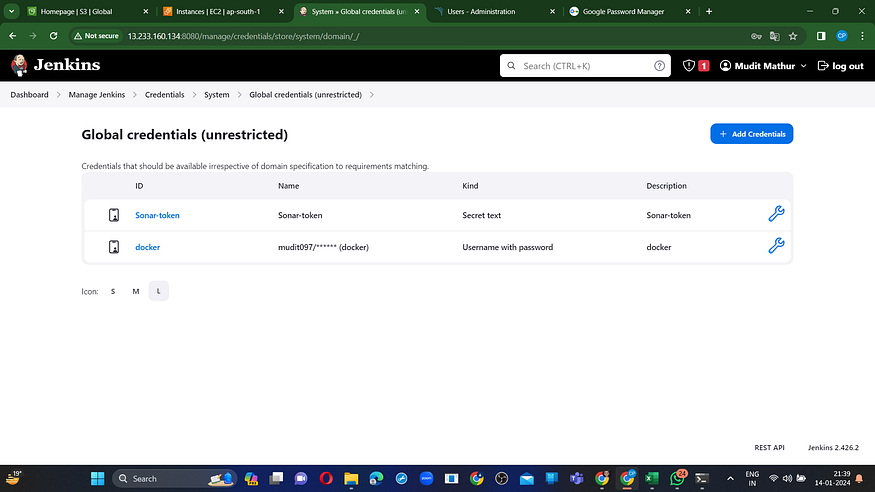
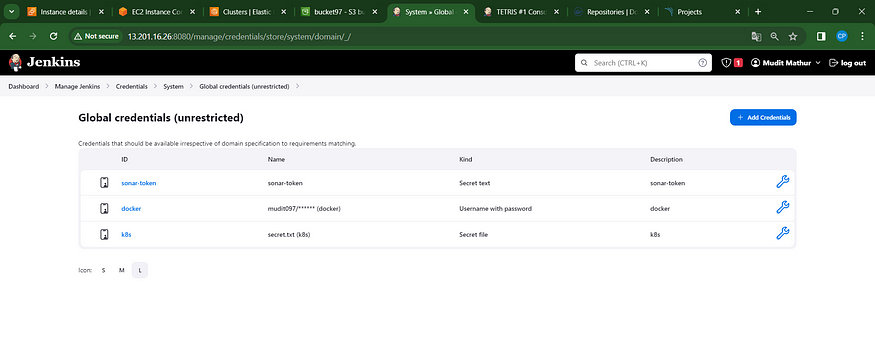
Navigate to the Jenkins Dashboard → Manage Jenkins → Credentials → Add Secret Text. Ensure it appears as follows:

You will see this page once you click on ‘create.’
Now, navigate to the Dashboard → Manage Jenkins → System and add the settings as shown in the image below.

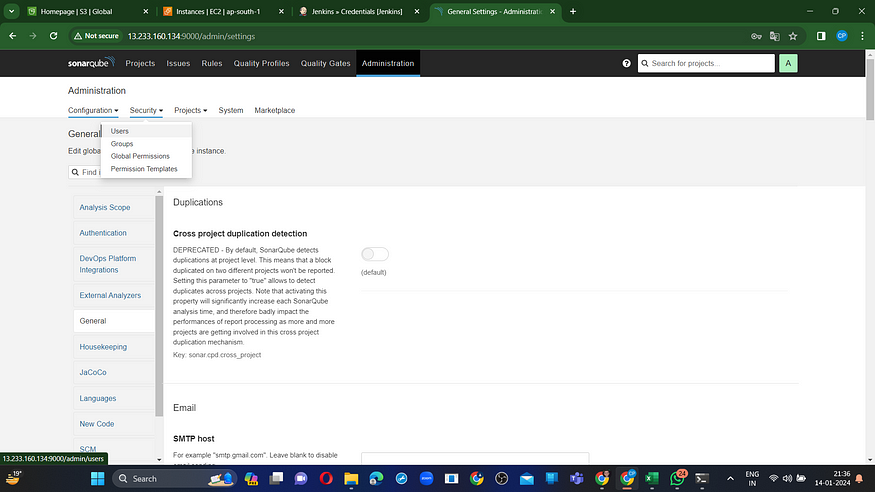
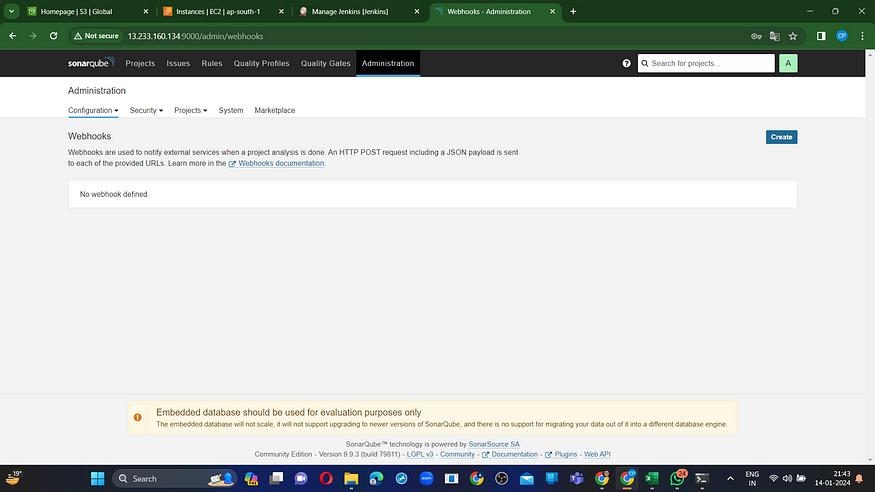
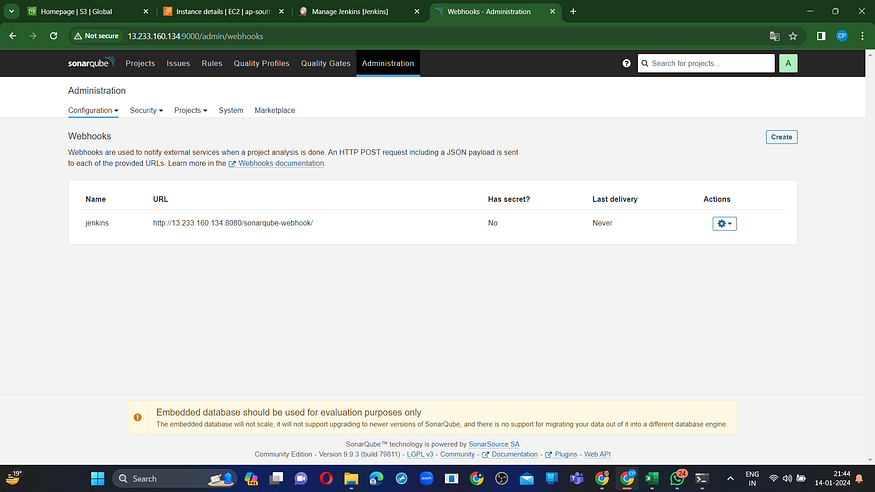
Click ‘Apply and Save’ in the Sonarqube Dashboard. Additionally, include a quality gate in the Administration section by navigating to Configuration and selecting Webhooks.
Click on Create
Add details
#in url section of quality gate
<http://jenkins-public-ip:8080>/sonarqube-webhook/>

Now, integrate Docker credentials with Jenkins to facilitate logging in and pushing the image.
Navigate to “Manage Jenkins” –> “Credentials” –> “Global” –> “Add Credential.”
Enter your DockerHub username and password in the provided fields under Global Credentials.
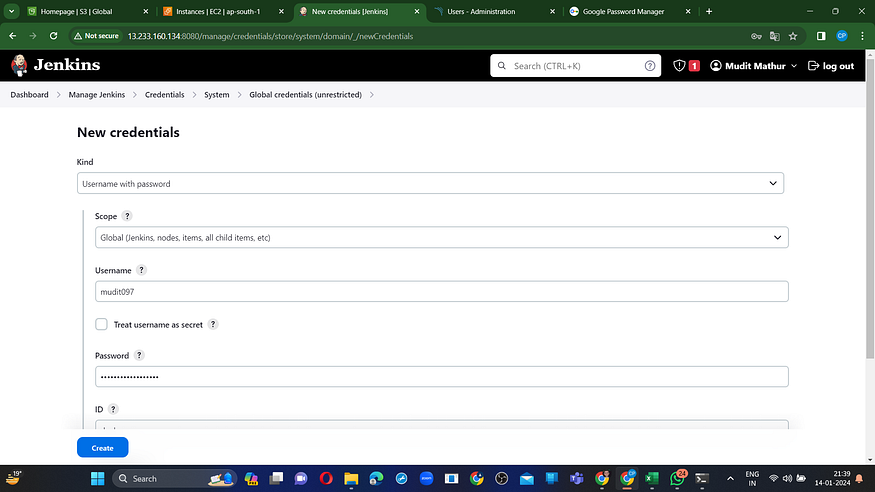
Create.
Step09: Pipeline upto Docker
Now, let’s generate a new task for our pipeline.
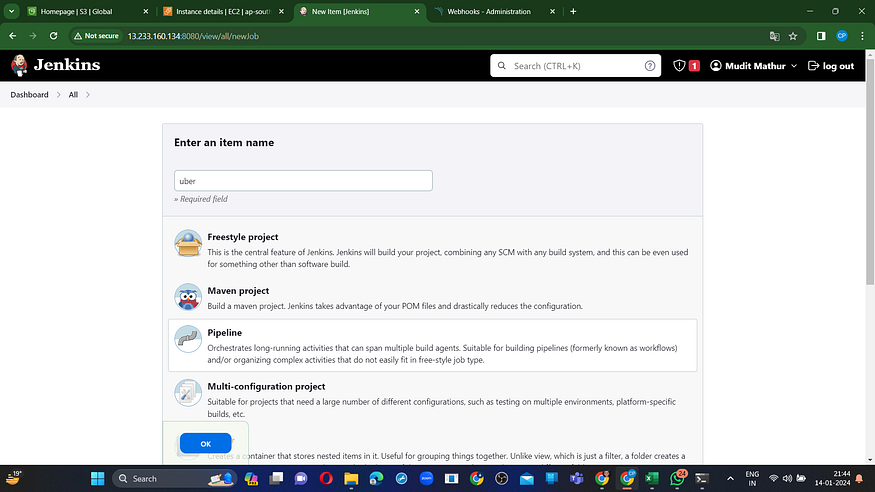
Add this to Pipeline
pipeline {
    agent any

    tools {
        jdk 'jdk17'
        nodejs 'node16'
    }

    environment {
        SCANNER_HOME = tool 'sonar-scanner'
    }

    stages {
        stage('Clean Workspace') {
            steps {
                cleanWs()
            }
        }

        stage('Checkout from Git') {
            steps {
                git branch: 'main', url: 'https://github.com/mudit097/uber-clone.git'
            }
        }

        stage("Sonarqube Analysis") {
            steps {
                withSonarQubeEnv('sonar-server') {
                    script {
                        sh "$SCANNER_HOME/bin/sonar-scanner -Dsonar.projectName=Uber -Dsonar.projectKey=Uber"
                    }
                }
            }
        }

        stage("Quality Gate") {
            steps {
                script {
                    waitForQualityGate abortPipeline: false, credentialsId: 'Sonar-token'
                }
            }
        }

        stage('Install Dependencies') {
            steps {
                sh "npm install"
            }
        }

        stage('OWASP FS SCAN') {
            steps {
                dependencyCheck additionalArguments: '--scan ./ --disableYarnAudit --disableNodeAudit', odcInstallation: 'DP-Check'
                dependencyCheckPublisher pattern: '**/dependency-check-report.xml'
            }
        }

        stage('TRIVY FS SCAN') {
            steps {
                sh "trivy fs . > trivyfs.txt"
            }
        }

        stage("Docker Build & Push") {
            steps {
                script {
                    withDockerRegistry(credentialsId: 'docker', toolName: 'docker') {
                        sh "docker build -t uber ."
                        sh "docker tag uber mudit097/uber:latest "
                        sh "docker push mudit097/uber:latest "
                    }
                }
            }
        }

        stage("TRIVY") {
            steps {
                sh "trivy image mudit097/uber:latest > trivyimage.txt"
            }
        }

        stage("Stop and Remove Existing Docker Container") {
            steps {
                script {
                    sh "docker stop uber || true"
                    sh "docker rm uber || true"
                }
            }
        }

        stage("Deploy Docker") {
            steps {
                script {
                    sh "docker run -d --name uber -p 3000:3000 mudit097/uber:latest"
                }
            }
        }
    }
}
Click “Apply and Save.”
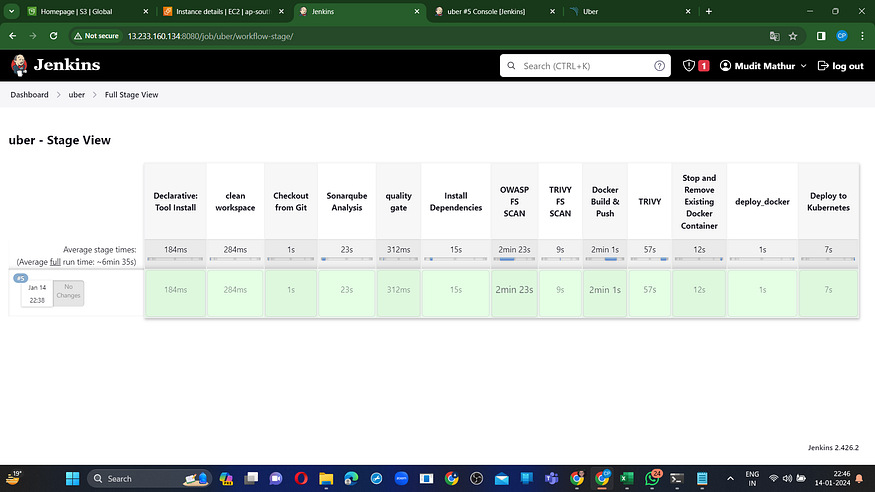
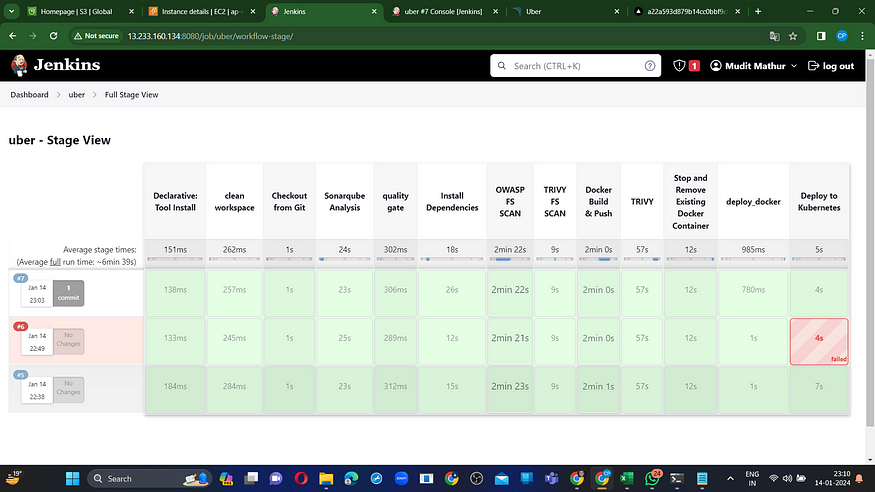
Initiate Build
View Stage

To access the report, navigate to the Sonarqube Server and select the “Projects” section.
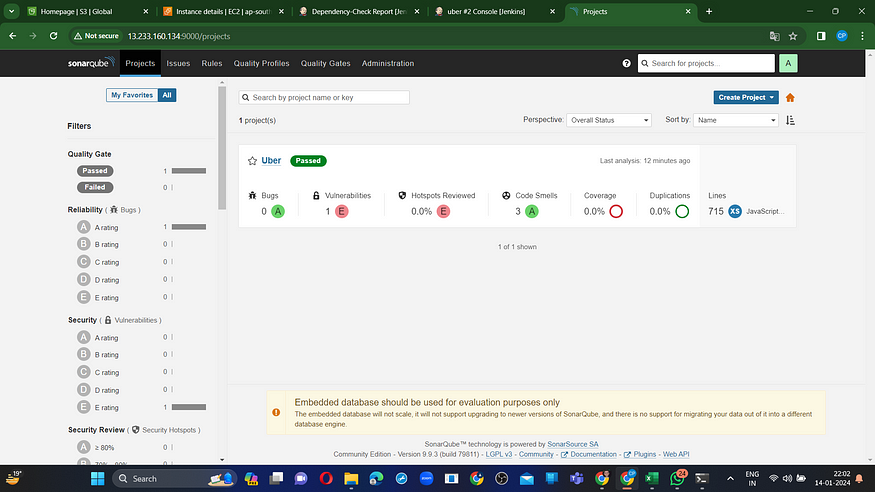
The report has been generated successfully, and the status indicates a pass. There are 715 lines that have been scanned. For a more comprehensive report, navigate to the “Issues” section.
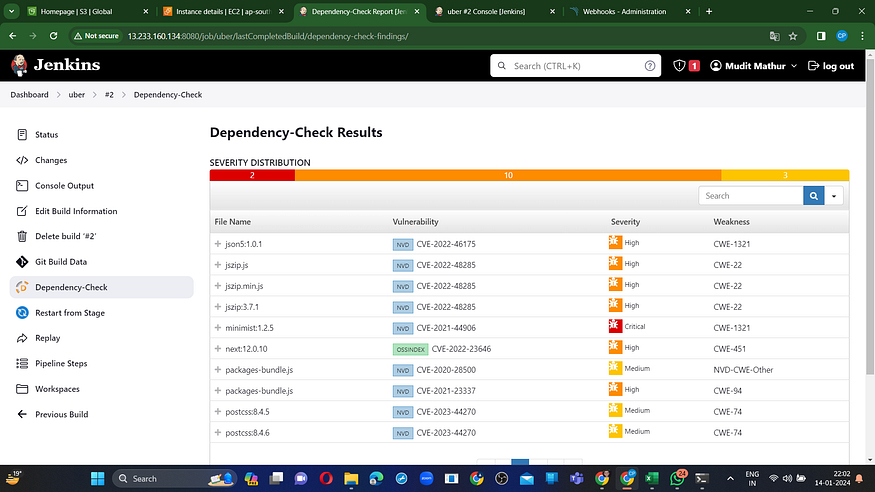
In the OWASP section, you’ll find a graphical representation of the status along with details on vulnerabilities.
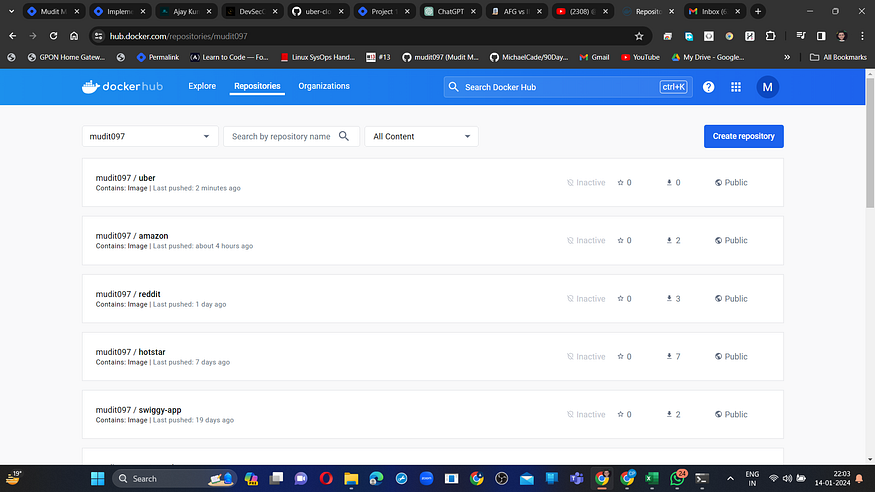
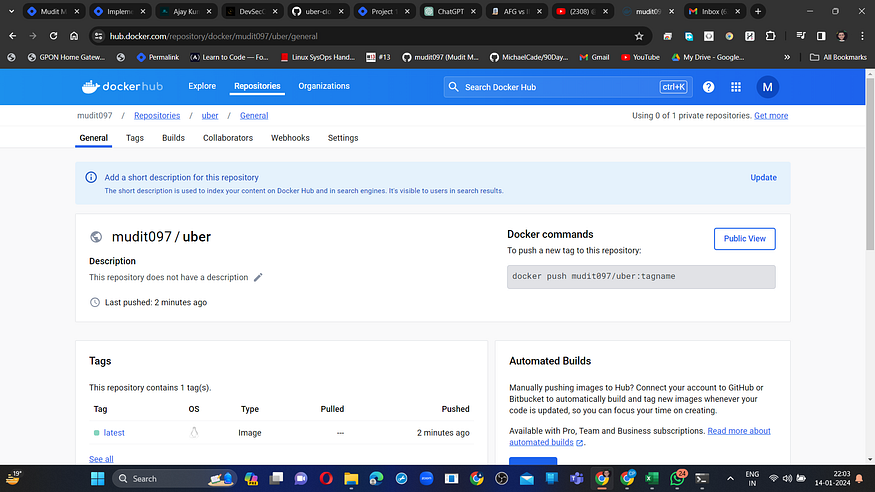
When logging into Docker Hub, you’ll notice the creation of a new image.
Step10: Kubernetes Deployment
Navigate to the Putty application on your Jenkins instance, access the SSH feature, and input the following command:
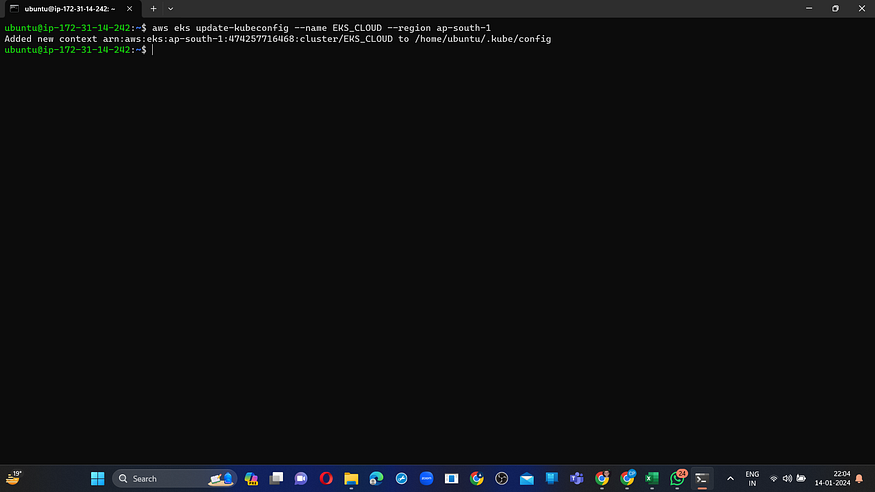
aws eks update-kubeconfig --name <CLUSTER NAME> --region <CLUSTER REGION>
aws eks update-kubeconfig --name EKS_CLOUD --region ap-south-1
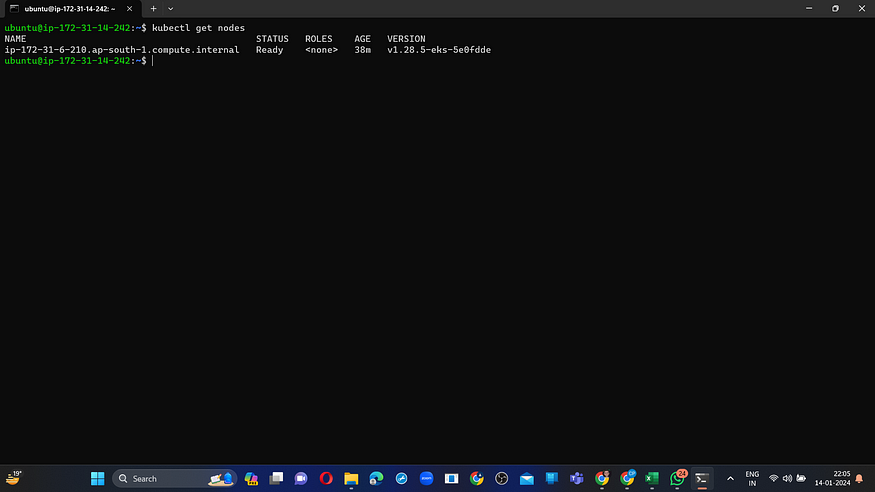
Let’s see the nodes
kubectl get nodes
Transfer the configuration file to the Jenkins master or the local file manager, and ensure to save it.
cat ~/.kube/config
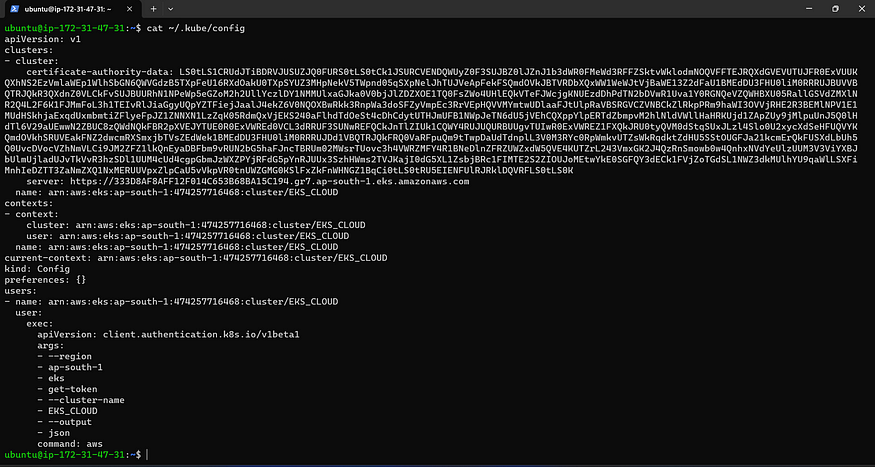
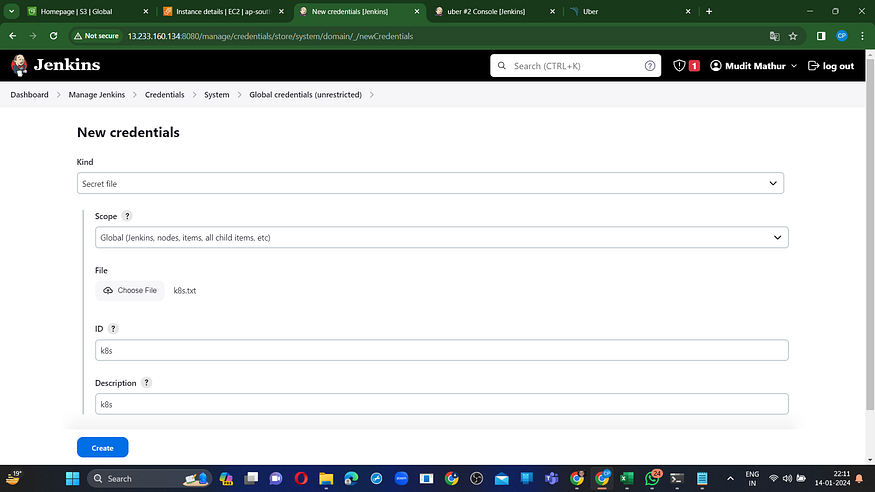
Copy and save the following text in a document or another folder. Save it as “secret-file.txt”:
Note: Create a secret-file.txt in your file explorer, save the configuration in it, and use it in the Kubernetes credential section.
Install the Kubernetes Plugin. Once it’s installed successfully,
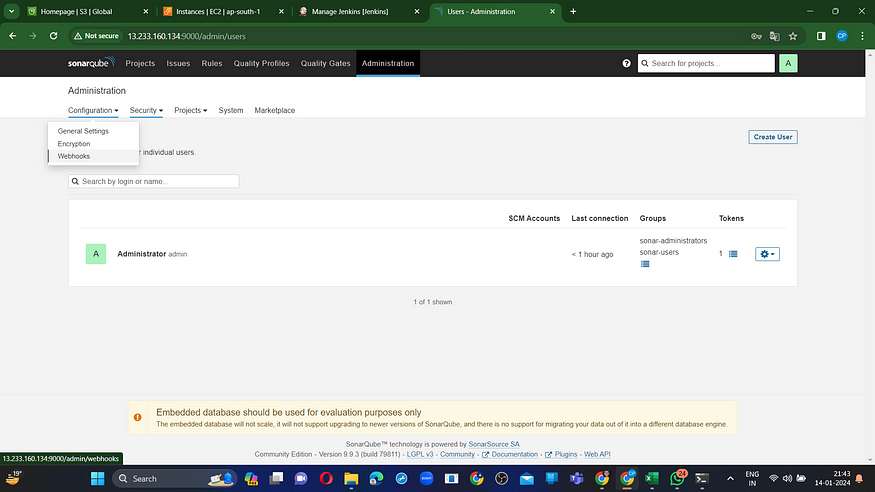
Navigate to “Manage Jenkins” → “Manage Credentials” → Select “Jenkins Global” → Click “Add Credentials.”
Finalizing the deployment process on the Kubernetes cluster.
// Stage 12: Deploy to Kubernetes
stage('Deploy to Kubernetes') {
    steps {
        script {
            dir('K8S') {
                withKubeConfig(caCertificate: '', clusterName: '', contextName: '', credentialsId: 'k8s', namespace: '', restrictKubeConfigAccess: false, serverUrl: '') {
                    sh 'kubectl apply -f deployment.yml'
                    sh 'kubectl apply -f service.yml'

                    // Get the external IP of the service
                    def externalIP = sh(script: 'kubectl get svc uber-service -o jsonpath="{.status.loadBalancer.ingress[0].ip}"', returnStdout: true).trim()

                    // Print the URL in the Jenkins build log
                    echo "Service URL: http://${externalIP}/"
                }
            }
        }
    }
}
You will observe output similar to the following:
def externalIP = sh(script: 'kubectl get svc uber-service -o jsonpath="{.status.loadBalancer.ingress[0].ip}"', returnStdout: true).trim()
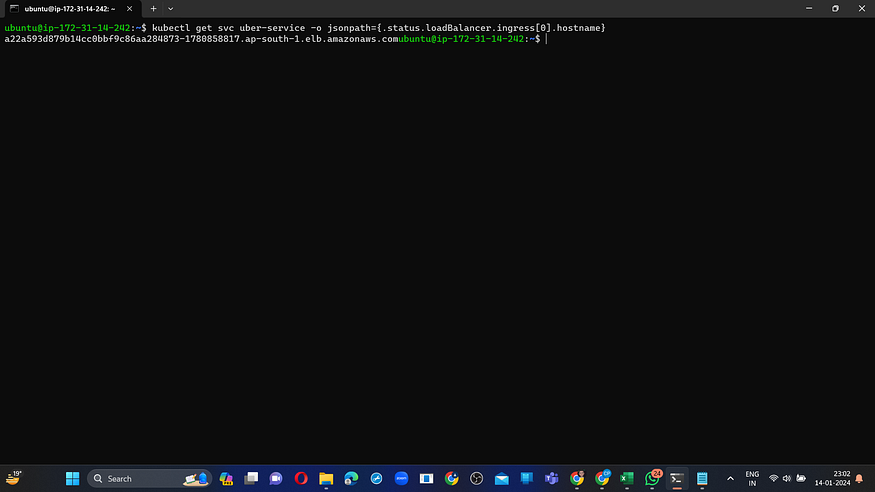
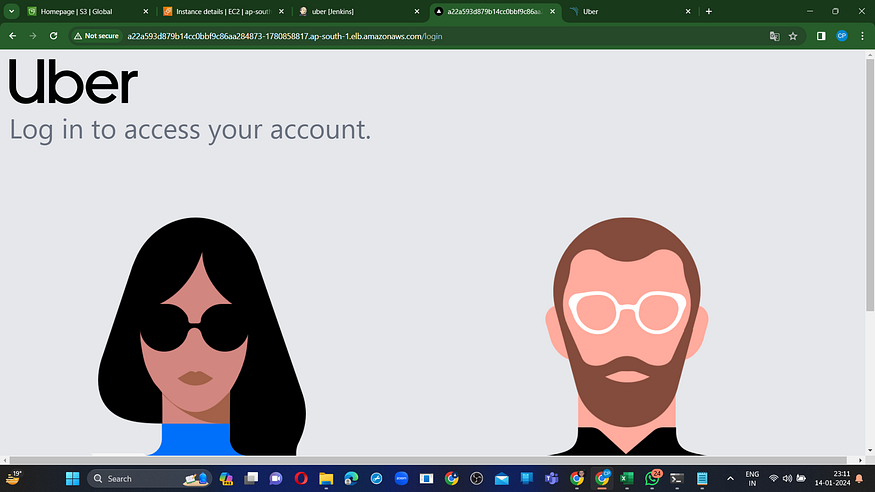
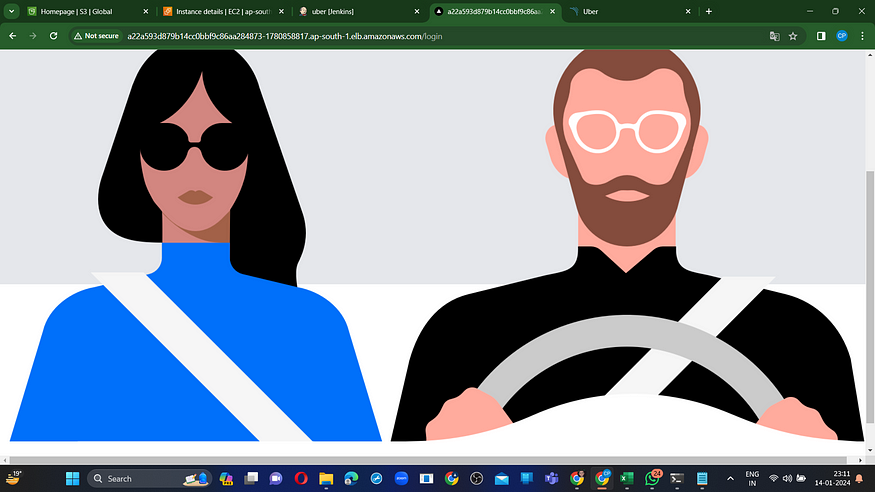
Access on web browser.

Step 11: Setup Monitoring on cluster
Create new pipeline.

Pipeline code:
pipeline{
    agent any

    stages {
        stage('Setup') {
            steps {
                script {
                    // Add Helm repositories
                    sh 'helm repo add stable https://charts.helm.sh/stable'
                    sh 'helm repo add prometheus-community https://prometheus-community.github.io/helm-charts'
                }
            }
        }
        stage('Deploy Prometheus') {
            steps {
                script {

                        withKubeConfig(caCertificate: '', clusterName: '', contextName: '', credentialsId: 'k8s', namespace: '', restrictKubeConfigAccess: false, serverUrl: '') {

                           // Check if the namespace 'prometheus' exists
                                def namespaceExists = sh(script: 'kubectl get namespace prometheus', returnStatus: true) == 0

                                // If the namespace doesn't exist, create it and install Prometheus using Helm
                                if (!namespaceExists) {
                                    sh 'kubectl create namespace prometheus'
                                    sh 'helm install stable prometheus-community/kube-prometheus-stack -n prometheus'
                                } else {
                                    echo 'Namespace prometheus already exists.'
                                }


                        }

                }
            }
        }
        stage('Patch Services') {
            steps {
                script {
                    withKubeConfig(caCertificate: '', clusterName: '', contextName: '', credentialsId: 'k8s', namespace: '', restrictKubeConfigAccess: false, serverUrl: '') {

                    // Patch Prometheus service to use ClusterIP
                    sh 'kubectl patch svc stable-kube-prometheus-sta-prometheus -n prometheus --type=json -p=\'[{"op":"replace","path":"/spec/type","value":"LoadBalancer"}]\''

                    // Patch Grafana service to use ClusterIP
                    sh 'kubectl patch svc stable-grafana -n prometheus --type=json -p=\'[{"op":"replace","path":"/spec/type","value":"LoadBalancer"}]\''
                     }
                }
            }
        }

        stage('Get Service URLs') {
            steps {
                script {
                    withKubeConfig(caCertificate: '', clusterName: '', contextName: '', credentialsId: 'k8s', namespace: '', restrictKubeConfigAccess: false, serverUrl: '') {

                    // Get the external IP or hostname of the service
                   def prometheus = sh(script: 'kubectl get svc stable-kube-prometheus-sta-prometheus -n prometheus -o jsonpath="{.status.loadBalancer.ingress[0].hostname}"', returnStdout: true).trim()

                     // Get the external IP or hostname of the service
                   def grafana = sh(script: 'kubectl get svc stable-grafana -n prometheus -o jsonpath="{.status.loadBalancer.ingress[0].hostname}"', returnStdout: true).trim()


                     echo "Service URL for prometheus: http://${prometheus}:9090"
                      echo "Service URL for grafana : http://${grafana}/"
                    }
                }
            }
        }
    }


}
Click on “Save”. and “Build Now”

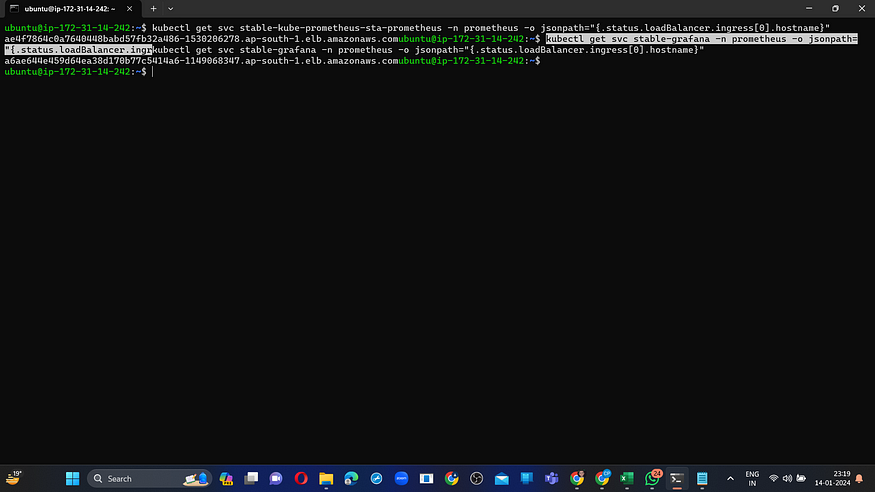
Find Weburl for grafana and premethus from Jenkins Console output.
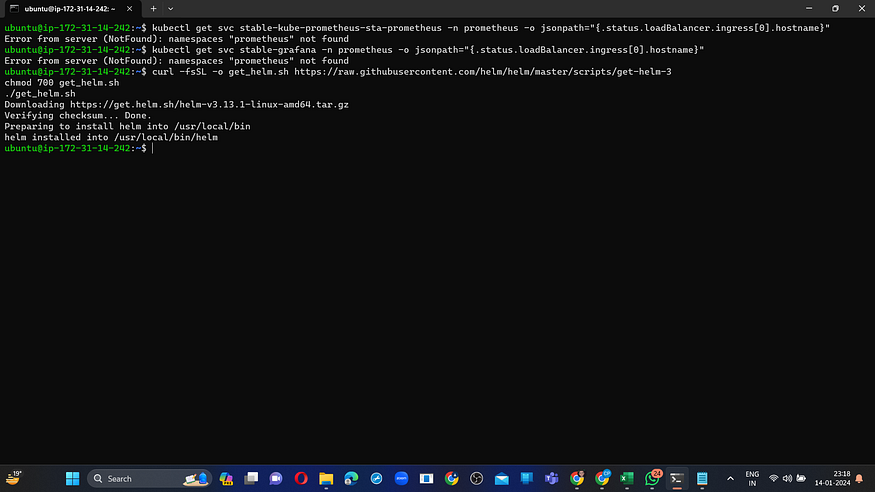
If you dont get url in Jenkins Console then you can run following command on terminal.
kubectl get svc stable-kube-prometheus-sta-prometheus -n prometheus -o jsonpath="{.status.loadBalancer.ingress[0].hostname}"

#for grafana url
kubectl get svc stable-grafana -n prometheus -o jsonpath="{.status.loadBalancer.ingress[0].hostname}"
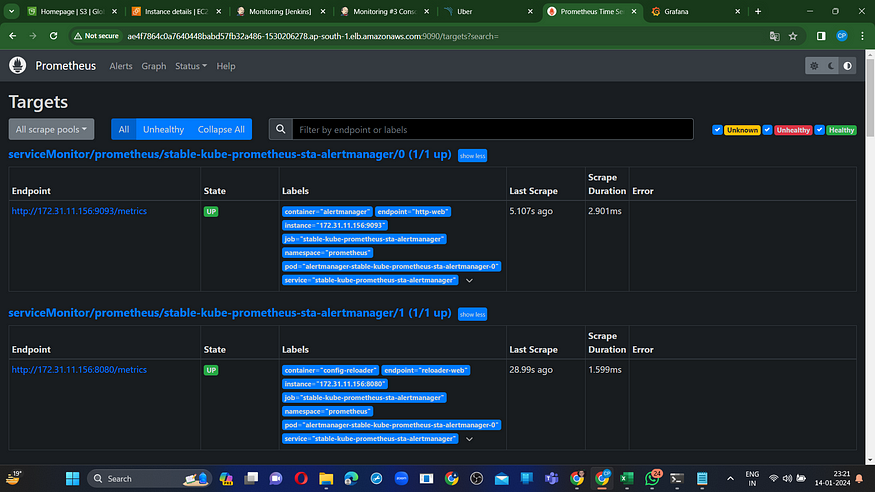
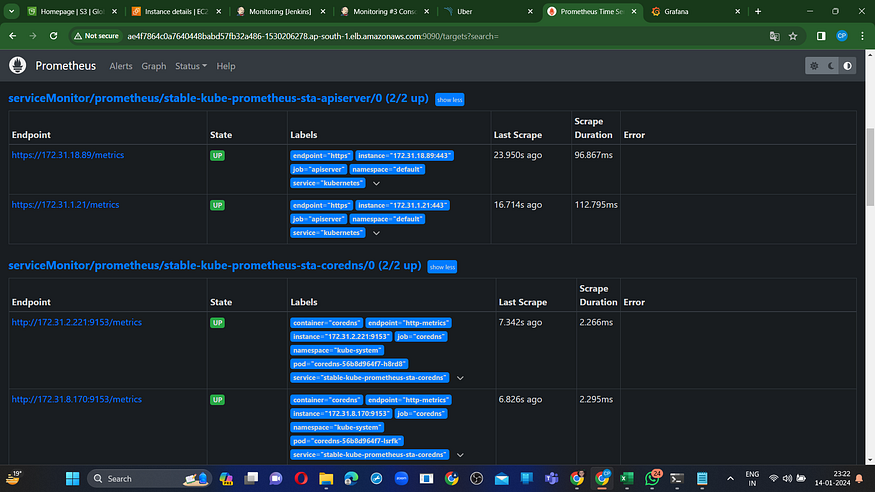
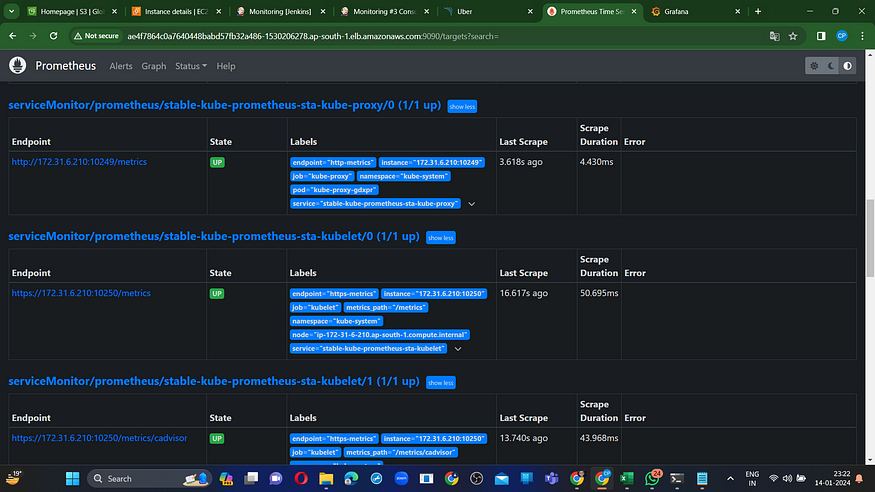
To open promethus url in browser you need to attach “:9090/targets” at end of url.
To open grafana url you might need to wait for a while.
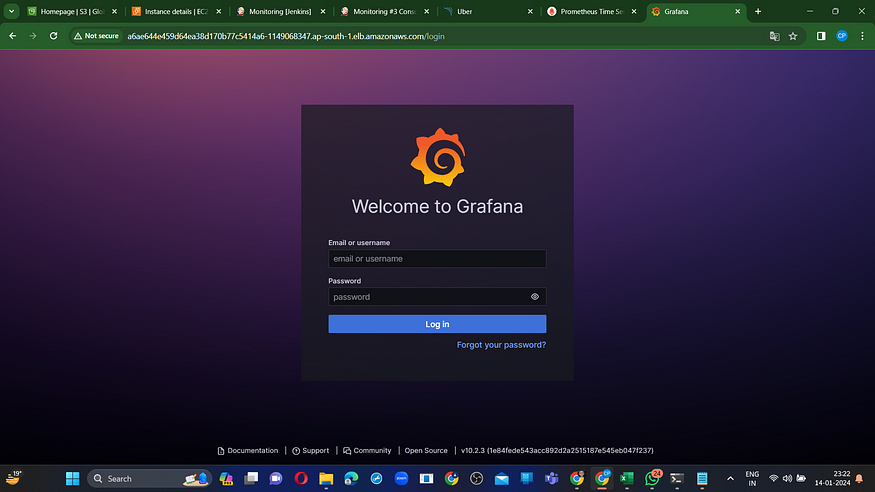

Enter user name "admin" and password "prom-operator"
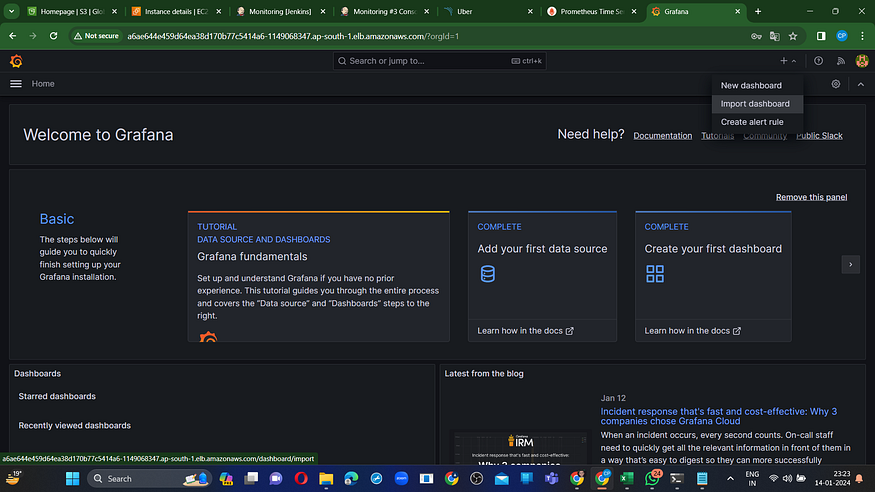
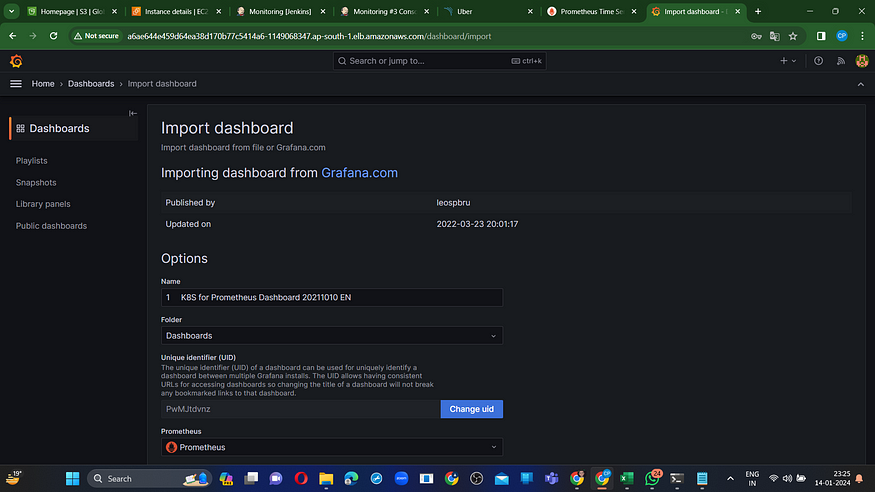
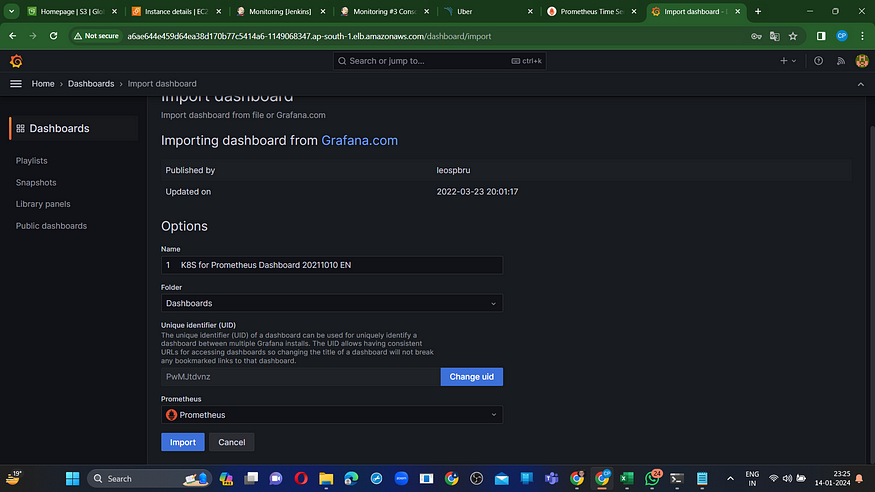
Click on “+” on right hand side and then click on import dashboard as shown in below screenshot.
Enter “15661” and click on “Load”
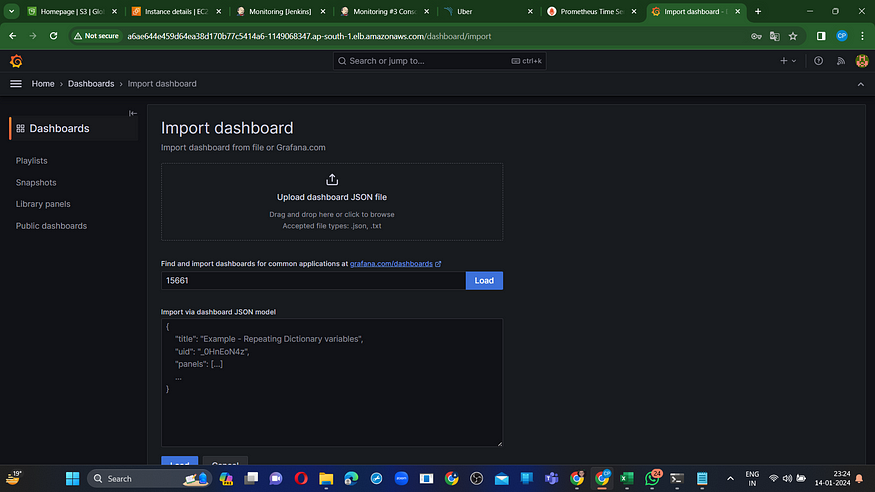
Then choose “prometheus” as source and Click on “Import”
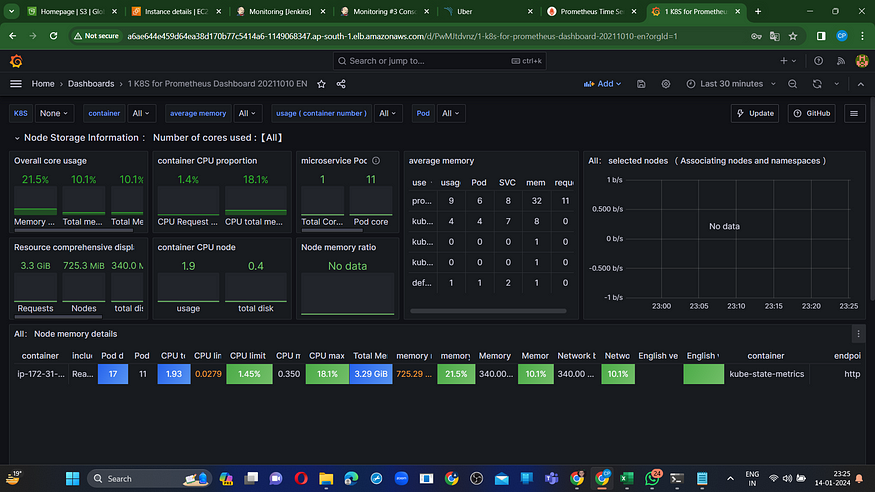
Here you go. Your dashboard is ready.
You can import dashboard as per your requirement from this site. https://grafana.com/grafana/dashboards/
Step 12: Destroy EKS cluster when your done with project.
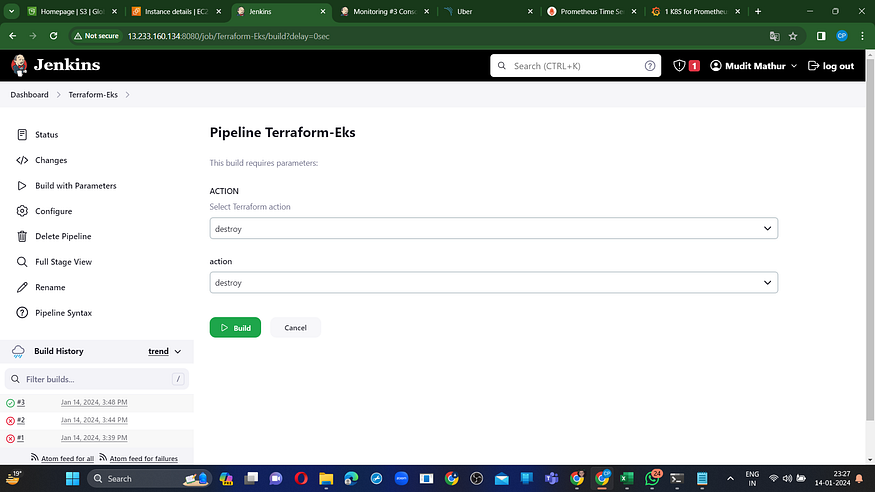
Don’t Forget to Destroy Terraform created Ec2 instance for Jenkins server.
Conclusion
Building an app like Uber with Jenkins has been exciting! 🚀 Jenkins helps smoothly put together Uber’s virtual world, like arranging blocks. It makes sure everything works well, and we’ve added special guards, Grafana and Prometheus, to watch over the app. 🌐 This guide takes you through each step, making sure your Uber Clone is safe and works great, from writing code to making it live. 🛠️💻 Let’s celebrate this success and make your Uber Clone even better!